Overview
An unofficial player wiki for asciilands.io, a survival, crafting and building game on a world of 326 hex regions. Recipes, items and stats come straight from the game's data; rules from the in-game Field Guide. Values marked tested were measured in play. Prices come from a live crawl of every market stall.
Contents
- Live mapevery build and market in the world, with layers to toggle
- Getting startedyour first hour, every control
- Survival & combathealth, hunger, every food, creatures, travel
- Itemsall items: stats, price, how to make, from-scratch cost
- Recipesevery recipe by station, and the shortcuts
- Materials & biomeswhere every ore, flower and rare find is
- Regionsall 326 regions, and what's on sale where
- Stationswhat to build and what each one makes
- Toolsevery tool in every metal, speed and stamina
- Smithing & swordsforging quality, durability calculator
- Magic12 spells in 4 schools
- Buildingpiece costs, decay, damage, region cap
- Towns & friendsfounding a town, plots, roles, parties
- Companionssix pets: food, talents, saddlebags
- Market & priceslive prices, craft-or-buy, merchant
- Infographicsthe printable guide sheets
Shortcuts the game doesn't tell you
Items with more than one recipe. Pick the route that fits what you have.
All recipes and every alternative route →
Quick answers
- Where's tin?
- Pan at any water's edge (highland and karst streams carry more), or mine tin ore in Limestone Karst (…Crags).
- Where's iron?
- Iron ore in Highlands (…Heights), bog iron in Cypress Swamp (…Fen). Both need a bronze pickaxe or better.
- How do I get steel?
- Smelter: 2 iron ingots + charcoal. Or smelt 1 Star Iron into 2 steel ingots. See Steel Ingot.
- Where's quartz, silver or amber?
- Hidden finds. Carry a Wayfinder Lens to see the five nearest as gold ◆ on your map. Quartz also comes from Plains.
- What happens when I die?
- You keep your inventory and respawn at your last rest point. Set one with Z at a campfire or camp.
- How much will X cost me?
- Open any item, e.g. Bronze Pickaxe: the "From scratch" box adds up every raw material, station and minute of smelting.
- How do I make gold?
- Sell basics to the merchant at any market stall, or list items at your own stall. Market shows what's worth crafting to sell.
Servers
- Two realms: Europe and North America. Pick one on the title screen. The NA map may differ from the EU one shown here.
- Each realm holds 70 players. When it's full you queue; every 4th queue spot goes to Ko-fi supporters.
- Idle for 14 minutes and you get a warning; at 15 minutes you're disconnected to free the slot.
- Your progress saves on the server. Guest characters belong to the browser: clearing its data loses them. Connect Discord to play the same character anywhere.
Items
Every item in the game. Click one for its stats, live price, every way to make it, what it's used for, and a from-scratch shopping list.
Loading game data...
Loading game data...
Recipes
All recipes from the game's data, grouped by where you make them. Processing recipes (campfire, smelter) also need fuel and take time; forge recipes are made in the smithing mini-game.
Loading game data...
Alternative routes
Everything that can be made more than one way.
Infographics
The printable guide sheets. Click one to open it full size.
Getting started
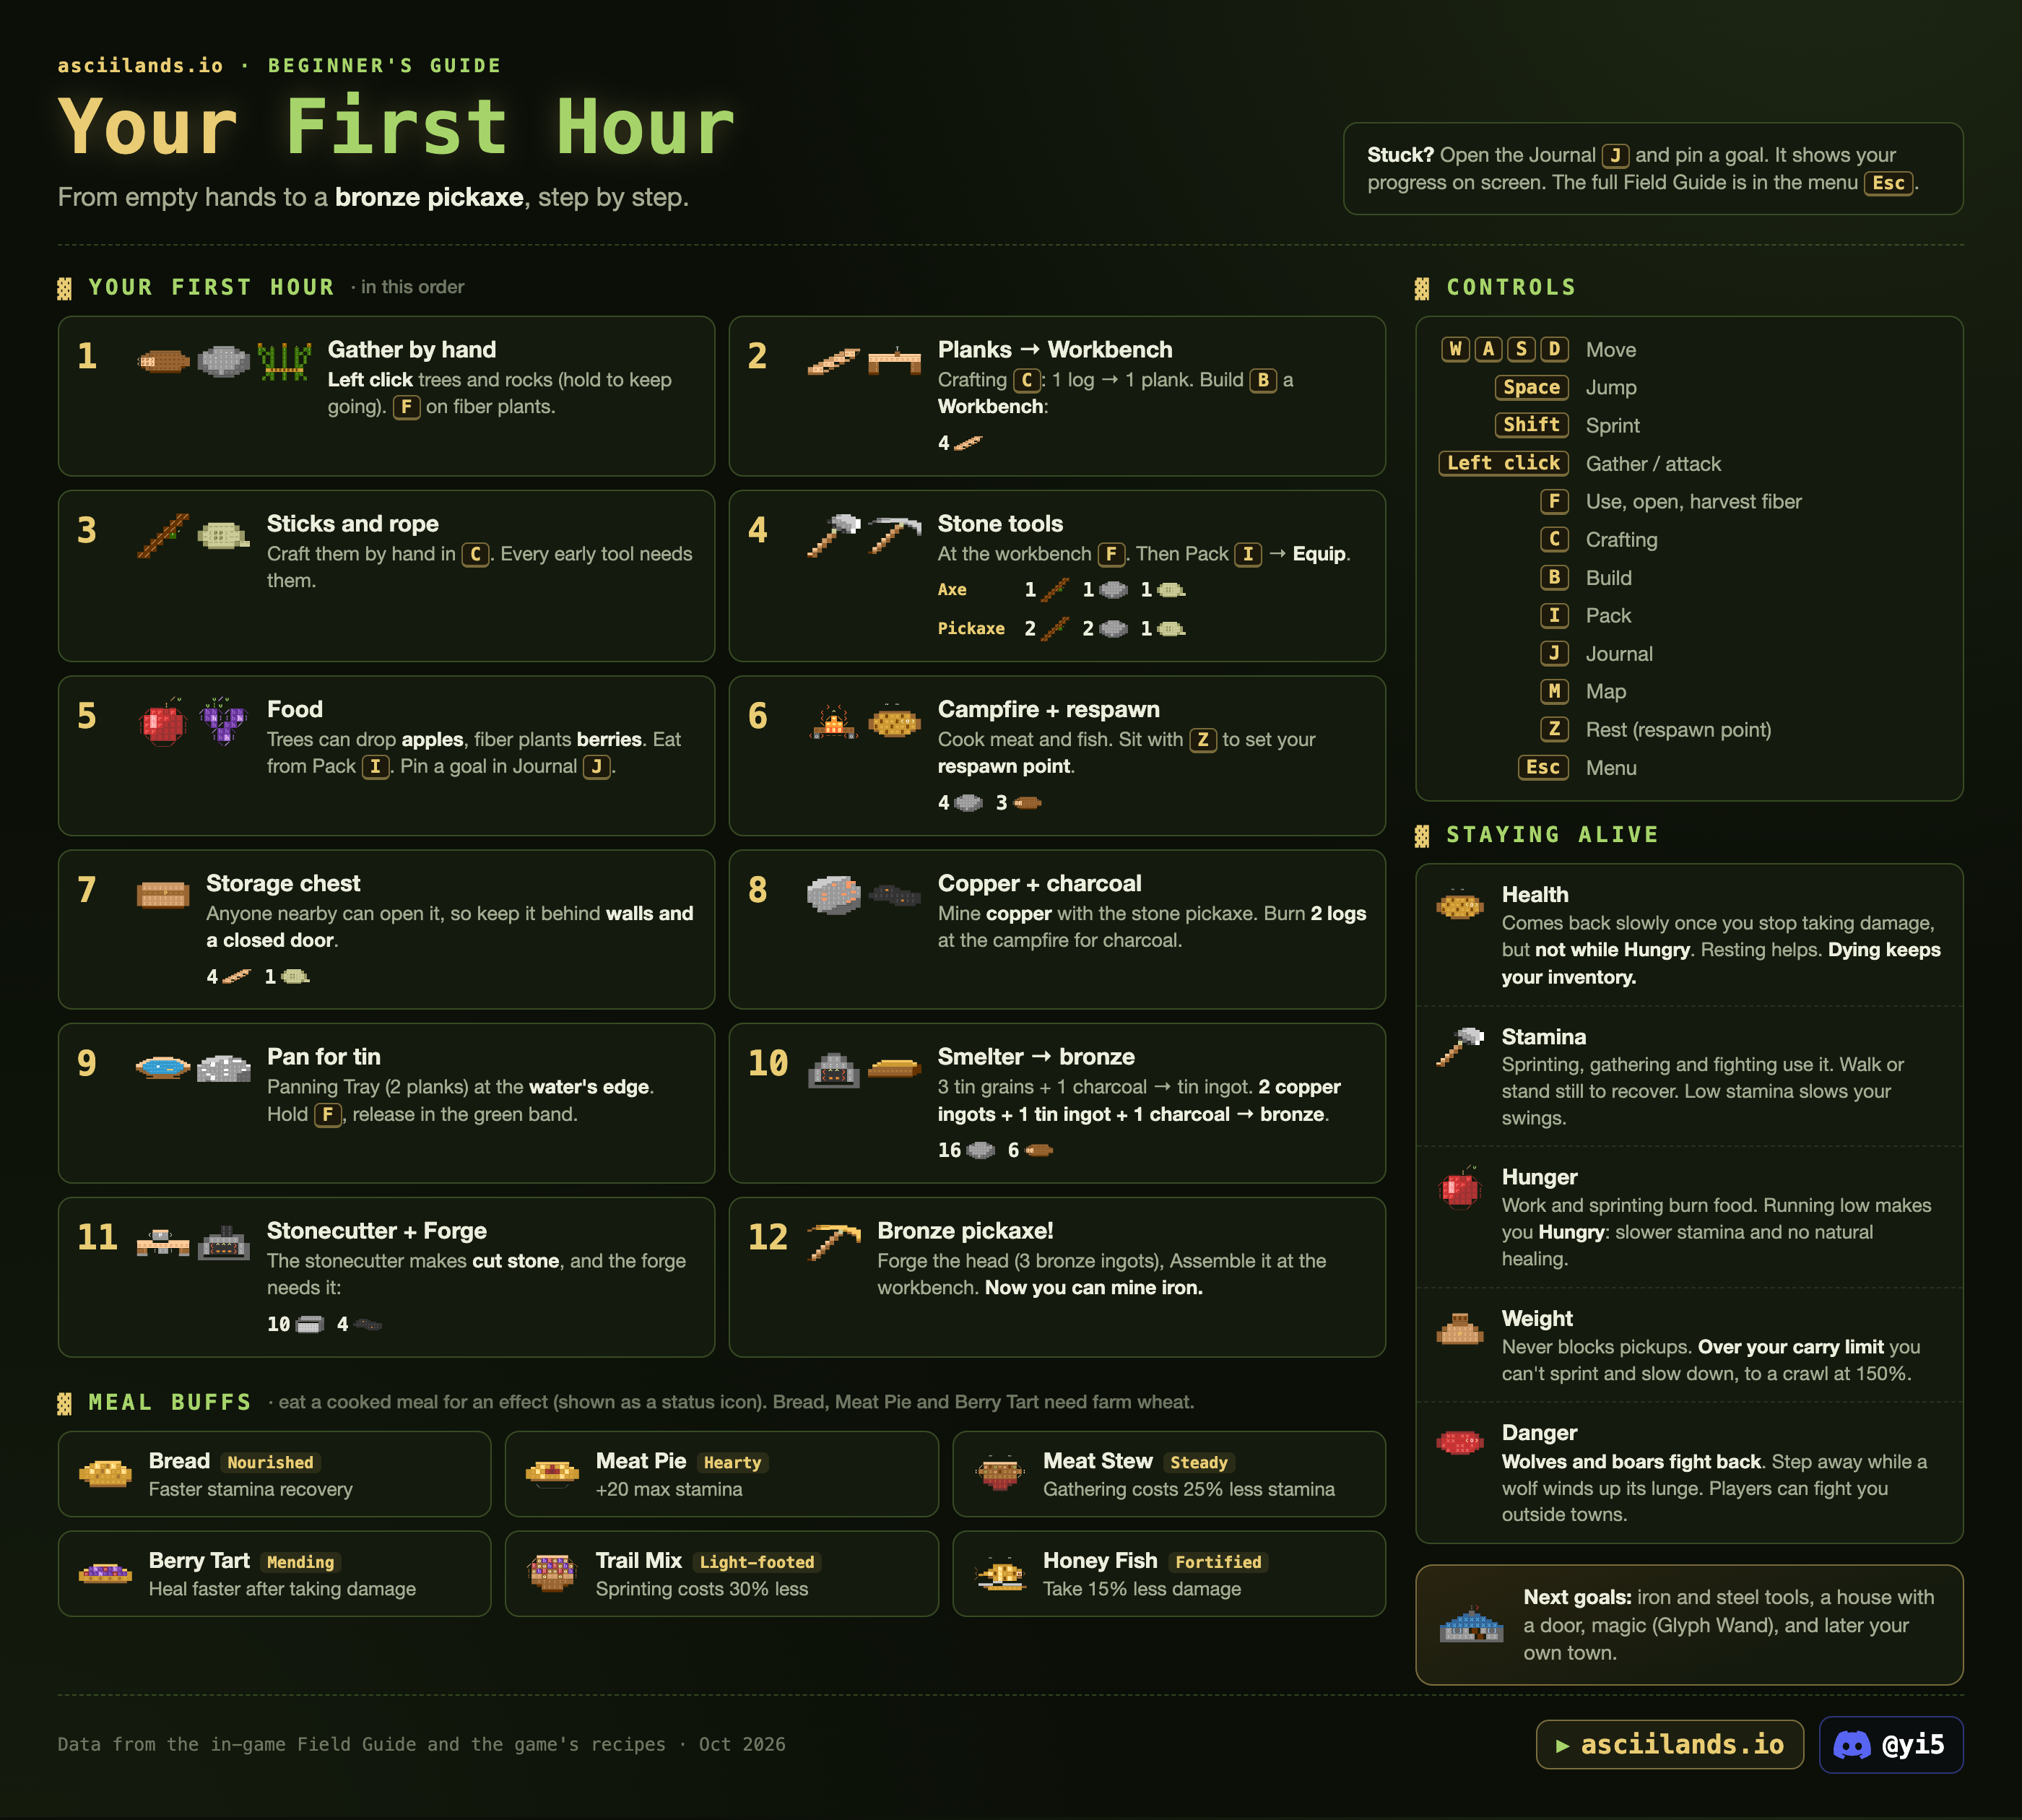
From empty hands to a bronze pickaxe. Stuck? Open the Journal J and pin a goal: it shows your progress on screen. The full Field Guide is in the menu Esc.
Your first hour
- Gather by hand. Left click trees and rocks (hold to keep going). F on fiber plants.
- Planks → Workbench. Crafting C: 1 log → 1 plank. Build B a Workbench (4 planks).
- Sticks and rope. Craft them by hand in C: 1 log → 2 sticks, 3 fiber → 1 rope. Every early tool needs them.
- Stone tools. At the workbench F: Axe = 1 stick + 1 stone + 1 rope, Pickaxe = 2 sticks + 2 stone + 1 rope. Then Pack I → Equip.
- Food. Trees drop apples, fiber plants drop berries. Eat from the Pack.
- Campfire + respawn. 4 stone + 3 logs. Cook meat and fish. Sit with Z to set your respawn point.
- Storage chest. 4 planks + 1 rope. Anyone nearby can open it, so keep it behind walls and a closed door.
- Copper + charcoal. Mine copper with the stone pickaxe. Burn 2 logs at the campfire for charcoal.
- Pan for tin. Panning Tray (2 planks) at the water's edge. Hold F, release in the green band. See Panning.
- Smelter → bronze. Smelter = 16 stone + 6 logs. 1 copper ore → copper ingot, 3 tin grains → tin ingot, 2 copper ingots + 1 tin ingot → 2 bronze ingots. Each batch burns 1 charcoal or 3 logs.
- Stonecutter + Forge. The stonecutter (12 stone + 2 sticks) makes cut stone; the forge needs 10 cut stone + 4 charcoal.
- Bronze pickaxe! Forge the head (3 bronze ingots), assemble it at the workbench. Now you can mine iron.
Controls
| Key | Action | Key | Action |
|---|---|---|---|
| WASD | Move | I | Pack (inventory). Number keys pick equipment. |
| Space | Jump | J | Journal (goals) |
| Shift | Sprint | M | Map. Choose World for the atlas. |
| Left click | Gather / attack (hold to keep going) | P | Magic |
| Right mouse | Guard with a melee weapon, draw a bow, drag the camera while building | K | Trade (at a stall) |
| F | Use stations, doors, chests; harvest fiber; pan | N | Social (friends, party) |
| C | Crafting | T | Town |
| B | Build | G | Show town plot edges |
| R | Rotate a piece / cast and reel a fishing rod | O | Settings |
| Z | Rest (sets your respawn point) | [ ] | Zoom (or scroll) |
| Alt | Free the cursor | Esc | Menu, Field Guide |
Movement keys can be changed in Settings > Controls.
Show the original infographic
Survival & combat
Four bars to watch, what food does, what happens when you die, and what bites back.
Staying alive
| Health | Attacks, fire and poison hurt you. Health comes back slowly once you stop taking damage (about 0.5 HP/s tested), but not while Hungry. Eating and resting help; fire and a roof heal faster while you rest. |
| Stamina | Sprinting, gathering and fighting use it. Walk or stand still to recover. Low stamina slows your swings, but you can keep harvesting on an empty bar. Food and resting at a fire speed it up. |
| Hunger | Work and sprinting burn food. When Hungry, stamina returns slower and you stop healing. Any bite fixes it. Snacks add a little fullness, cooked food more. |
| Weight | Never blocks pickups. Over your carry limit you can't sprint and walk slower, down to a crawl at 150%. A Simple Bag raises the limit (450 → 750 kg tested, just by carrying it). |
Food
Eat from the Pack I. Fullness rises right away; recovery builds over 30 seconds. A prepared dish gives one effect while it digests. Only your newest one counts.
Death and respawning
- You keep your inventory when you die. Choose Respawn to return to your last rest point, even from another region.
- Set a rest point with Z next to a campfire or camp (within about 9 m). Look for "Rest point set". Moving or fighting makes you stand up.
- If your campfire or camp is gone, you return to where you started. On EU new characters start in Hollowmere Redleaf Woods.
- A Camp (10 logs + 2 rope) is a rest point out in the wild: build one before a long trip.
Fighting
- Left click strikes. Hold Right mouse with a melee weapon to guard against attacks from the front. Attacks use stamina.
- Melee reach is about 4.5 m, a spear about 6.5 m. A swing hits whoever is closest to straight ahead, so it can hit a bystander. tested
- Bows: hold Right mouse to draw (a full draw takes one second and slows you), release to fire. Release too soon and the shot is cancelled. Each shot uses an arrow.
- PvP: players can fight you anywhere outside towns. Claimed town land protects everyone on it.
- Defeated animals give meat and hides.
Creatures
The creature list comes from the game's sprite files. The item column is the matching drop seen on the market. Where a cell is empty, we haven't tested it.
| Creature | What we know | Related item |
|---|---|---|
| Wolf | Fights back. Step away while it winds up its lunge. 48 HP, 16 damage per bite, ~0.65 s windup. Stays within about 180 m of its home and attacks again if you rest inside that circle. A bronze spear kills one in 2–4 hits. tested | wolf pelt, raw meat |
| Boar | Fights back. | boar tusk |
| Deer | Flees. The only animal that dropped sinew in our tests (wolves and boars never did). | hide, sinew |
| Mossback | Slams the ground in an area. Very dangerous: killed a fresh character in about 7 s. Run. | mossback core |
| Wisp | Fires embers at you. | wisp ember |
| Scorpion | A fennec companion warns you about them from farther away. | scorpion venom |
| Bear | bear hide | |
| Cave lynx | lynx pelt | |
| Marsh boar | marsh tusk | |
| Ash monitor | monitor scale | |
| Sand crab | crab shell | |
| Gazelle · Ibex | gazelle horn · ibex horn | |
| Hare · Snow hare | hare fur · snow hare fur | |
| Fox · Fennec · Red panda · Heron | Can be tamed as companions. | fox pelt · fennec fur · panda fur · heron feather |
On the map, peach diamonds mark wildlife.
Moving around
- Walk to a region's edge to travel. A hint near the edge names the next region. See World map.
- Slopes slow you down a lot when climbing tested: about 7 m/s at a 1-in-2 grade, 1–2 m/s at 1-in-1, and almost nothing on steeper ground. Going downhill is as fast as the flat (11–13 m/s). Walk around ridges.
- Shallow water (about 1.5 m deep) is waded at full speed. Deep water is swum at about 3 m/s. tested
- Sprinting is roughly three times walking speed but costs stamina.
- A region can hang on "Preparing the terrain… taking longer than expected" for about 90 s and then load by itself. "Retry loading" reloads the whole page.
Materials & biomes
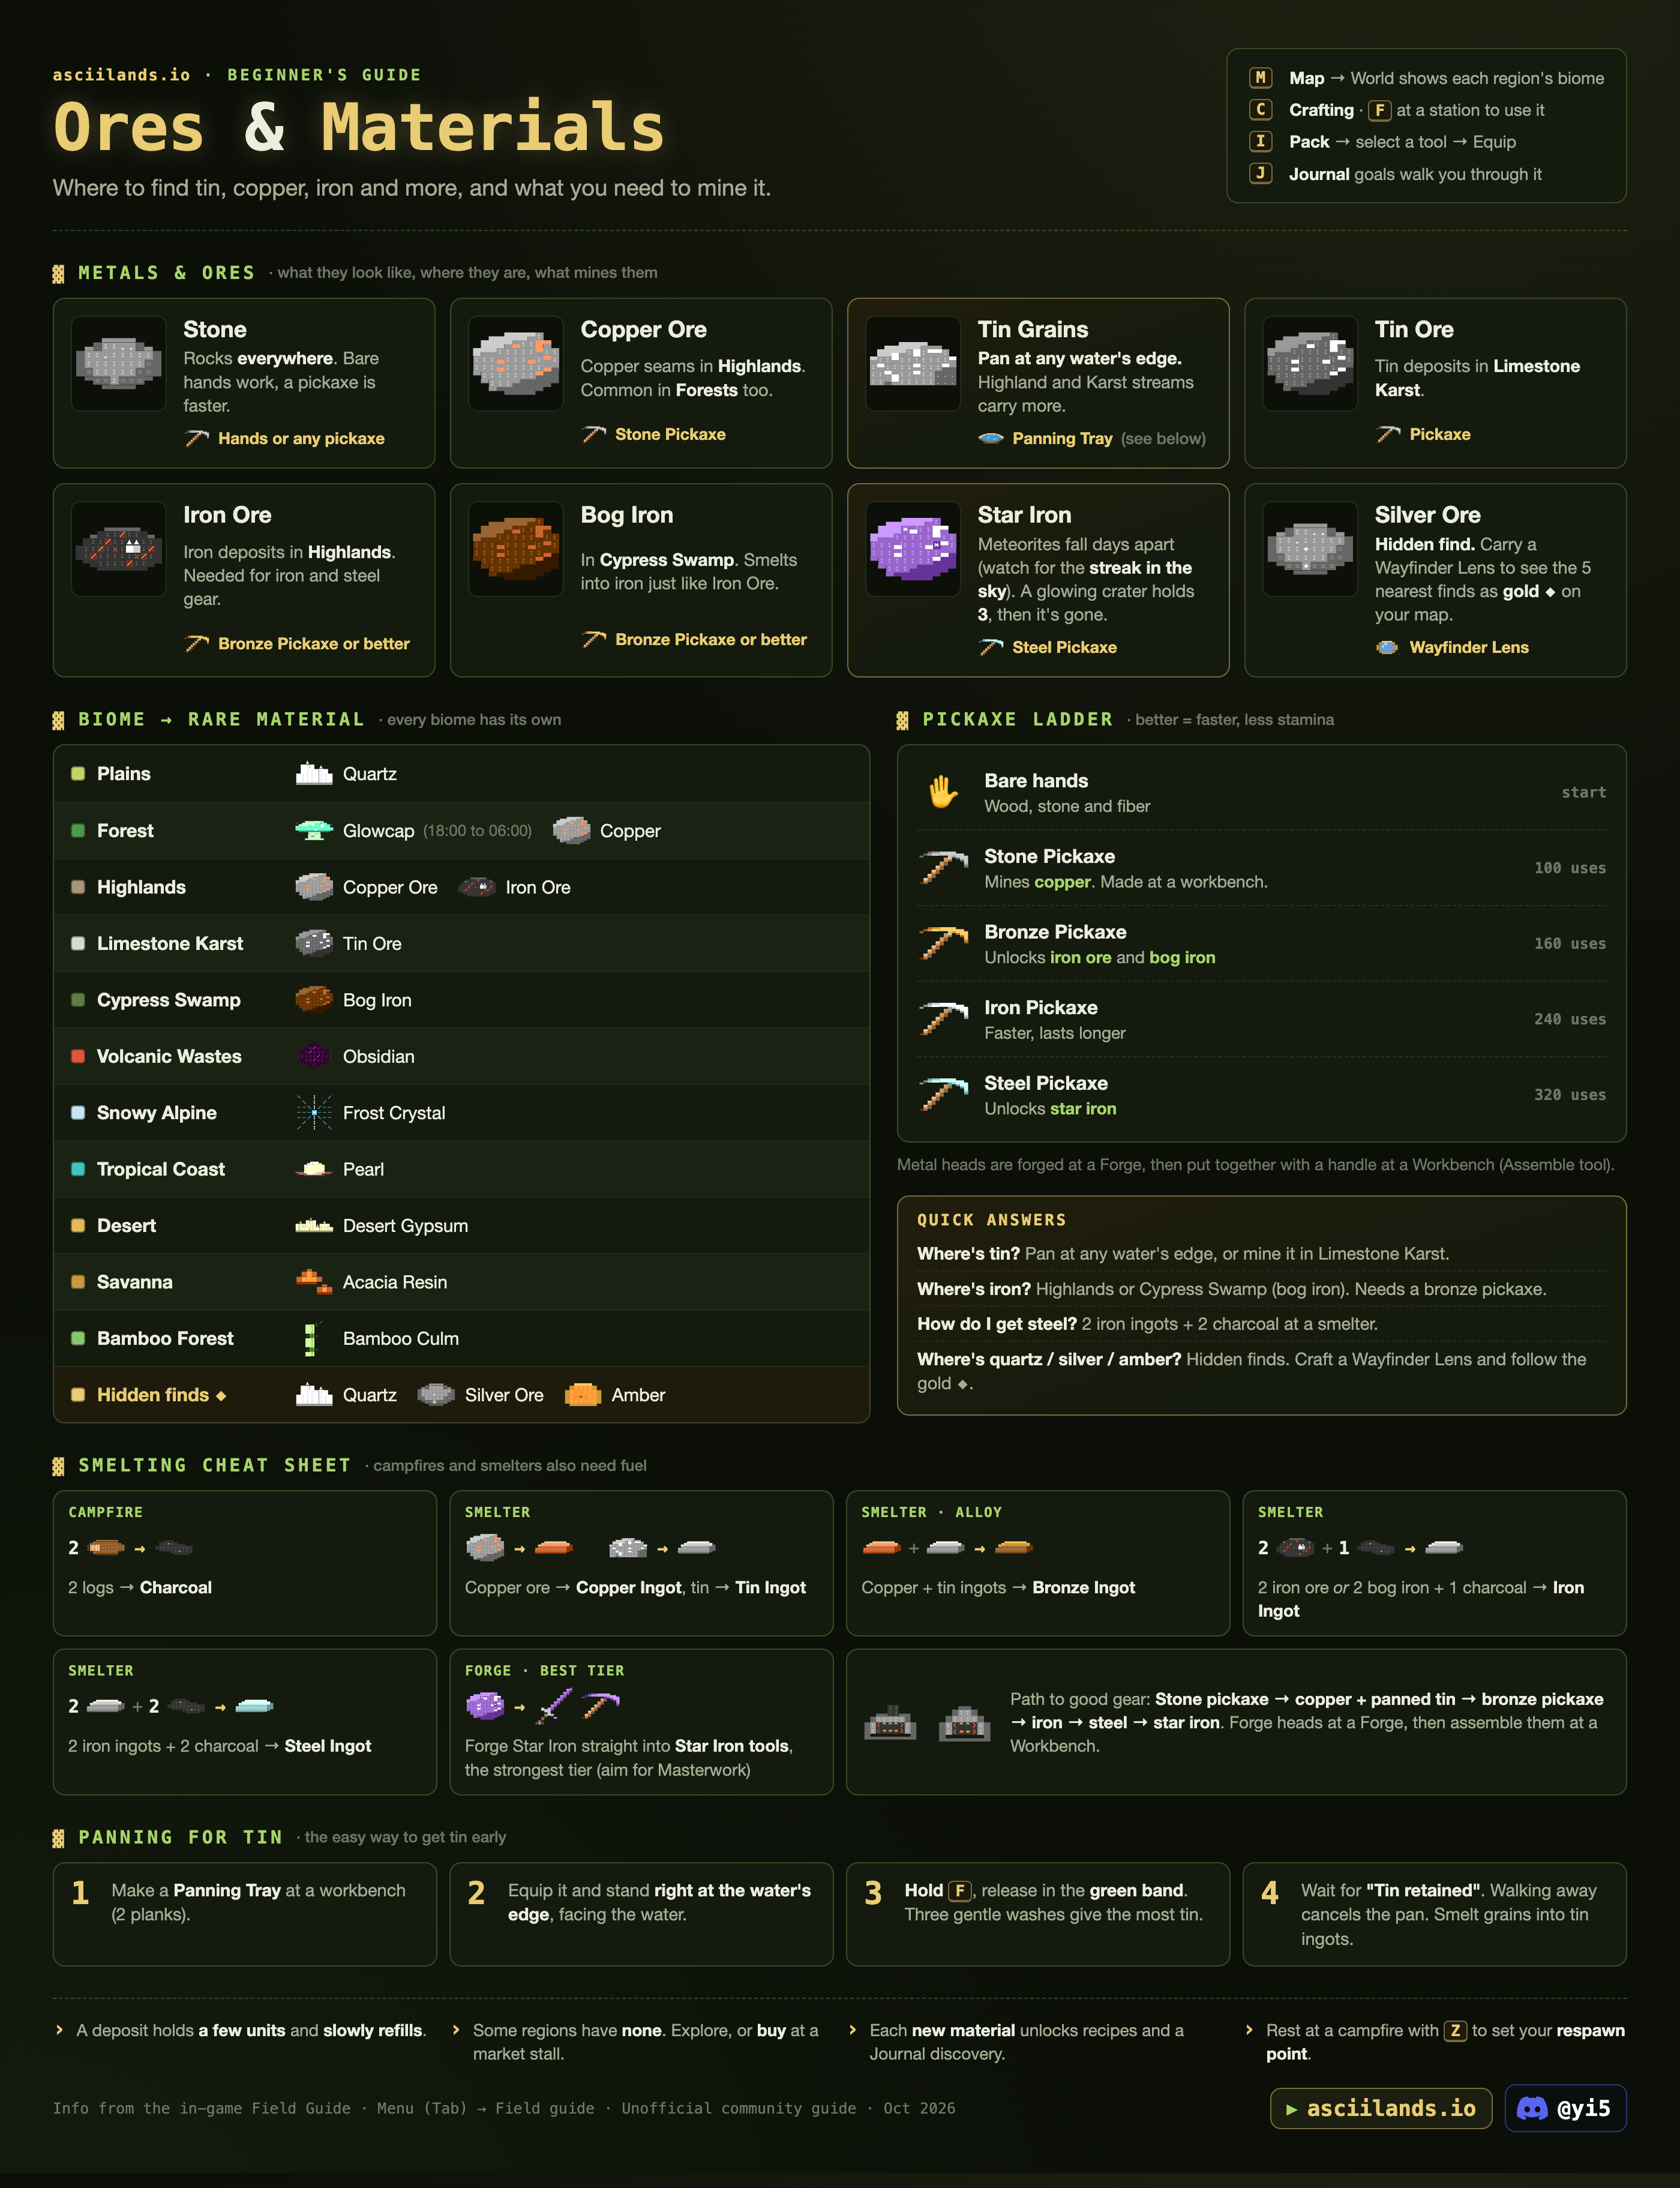
Each kind of land has its own materials. A deposit holds a few units and slowly refills. Some regions have none, so explore or trade. Finding a new material reveals its recipes and a Journal discovery.
Basics
Metals and ores
Biomes and their rare material
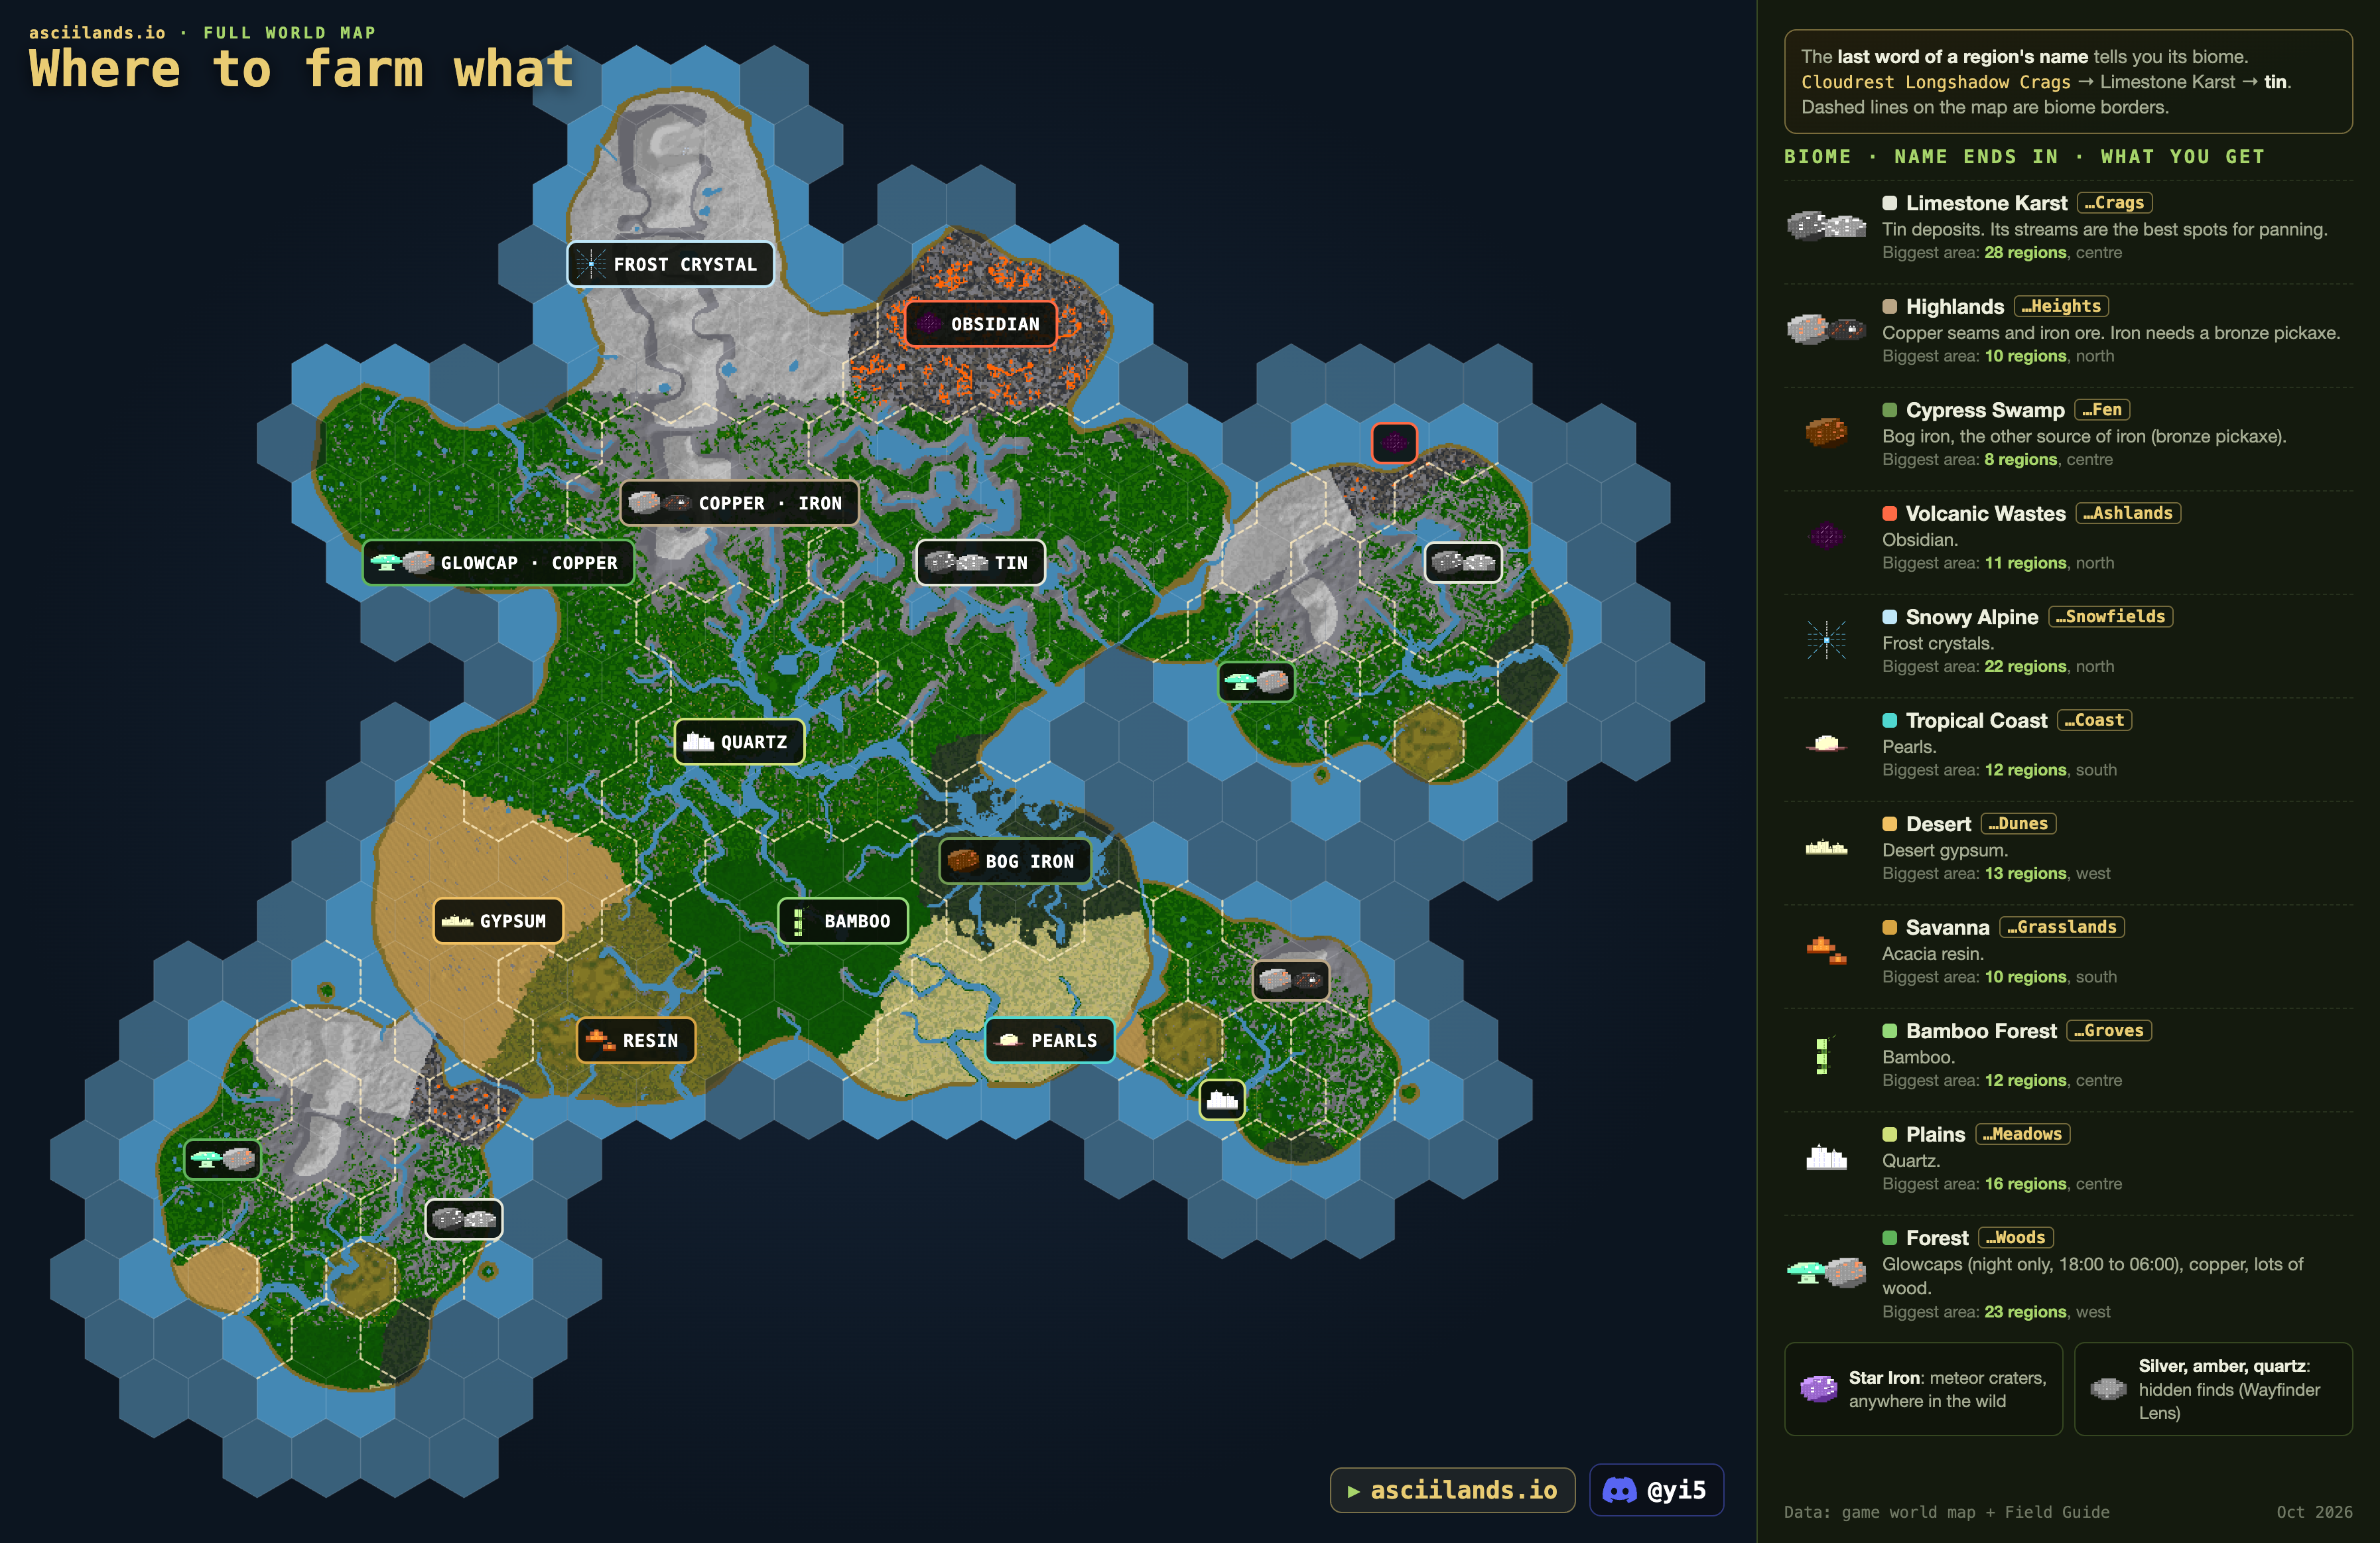
The last word of a region's name tells you its biome: Cloudrest Longshadow Crags is Limestone Karst, so it has tin.
Four regions end in "Isle" instead: two Plains, two Forest.
Hidden finds
Quartz, silver ore and amber can turn up as hidden finds anywhere. Craft a Wayfinder Lens at a workbench and carry it: your map marks the five nearest finds as gold ◆.
Market: amber · quartz · silver ore · gold fleck
Meteorites and Star Iron
- Meteorites fall in the wilderness, days apart. Watch for the streak across the sky.
- "A meteorite has fallen!" means somewhere in your region (no coordinates). "A distant star falls … to the direction" means a farther one.
- A glowing crater holds 3 Star Iron. Once mined out, it's gone. Mining it takes a steel pickaxe.
- Star Iron weighs 2.5 kg. A sword head needs 3. Smelt 1 Star Iron + 1 charcoal into 2 steel ingots, or forge Star Iron heads at a Forge.
Panning for tin
- Make a Panning Tray at a workbench (2 planks).
- Equip it and stand right at the water's edge, facing the water.
- Hold F to wash and release while the marker is in the green band. Each gentle wash speeds up the next and narrows the band. Two earn extra tin, three earn the most. Hold F early to queue the next wash.
- Wait for "Tin retained", then repeat until the pan fills. After three gentle washes, hold F to finish. Holding throughout still gives a little tin. Walking away cancels the pan.
The first pan of a new character gave 3 tin grains and finished both tin goals. tested
Fishing
Make a fishing rod (120 uses), equip it and face open water. Hold R to choose the cast distance, release, stay still and watch the float. When BITE appears, press R to reel in. Walking away breaks the line. Cook the catch at a campfire.
Magic flowers
| Flower | Where | Used for | Market |
|---|---|---|---|
| Asterisk ✱ | Forests | Fire spells | |
| Tildereed ~ | Tropical Coast (found in Hollowmere Crow Coast) | Water spells, Purify | |
| Hashfern # | Forests (rare) | Shield spells | |
| Crosswort + | Highlands (e.g. Hearth Drift Heights) | Healing spells | |
| P Ony | Forests | Renewal | |
| Glowcap | Forests, 18:00 to 06:00 | Mend (alternative recipe) |
Show the original infographics
Live map
Every build and every market across all 326 regions, from the latest crawl. Switch layers on and off in the Layers panel. Drag to move, right-drag (or two fingers) to turn, scroll or pinch to zoom, double-click to fly in.
Busiest building sites
| Loading… |
How to read it
- Each hex is one region, about 1.5 km across, coloured by land type. The map has no hills, so every base sits on its hex at its own floor level.
- Pieces are to scale: a foundation is a 6 m square and a wall is one 6 m storey. Town halls show gold, market stalls amber.
- The collector re-reads every region about once an hour. This page checks for new data every minute and redraws when a crawl lands.
Regions
Every hex is a region, coloured by its land type. Hexes ringed in gold have players selling there. Hover or tap a hex for details.
How regions work
- The world is a grid of hexagonal regions, each about 1.5 km across. Walk across any side of the hex and you enter the neighbour on that side, arriving on its opposite edge.
- You cross as soon as you pass the seam, about 736 m from the region centre. Cutting across a hex corner can drop you into the wrong neighbour.
- Every region has its own buildings, deposits, wildlife and market stalls. Each holds at most 4,096 placed pieces.
- The map M shows the local area. Choose World for the atlas: regions start unknown and become discovered or visited per character. A heron companion can Scout one more ring.
- Meeting friends? Their region names show in Social N.
Places worth knowing (EU)
| Hollowmere Redleaf Woods | World spawn: where new characters, and anyone without a rest point, start. |
| Hollowmere Crow Coast | Tildereed grows here (several coasts nearby had none). |
| Hearth Drift Heights | Crosswort grows here. Its west exit sits on a 550 m ridge, so cross further south. |
| Ancient ruins | Broken arches and weathered stonework. Search the courtyard for supplies and the occasional old inscription. |
Busiest markets right now
- Loading…
Stations & recipes
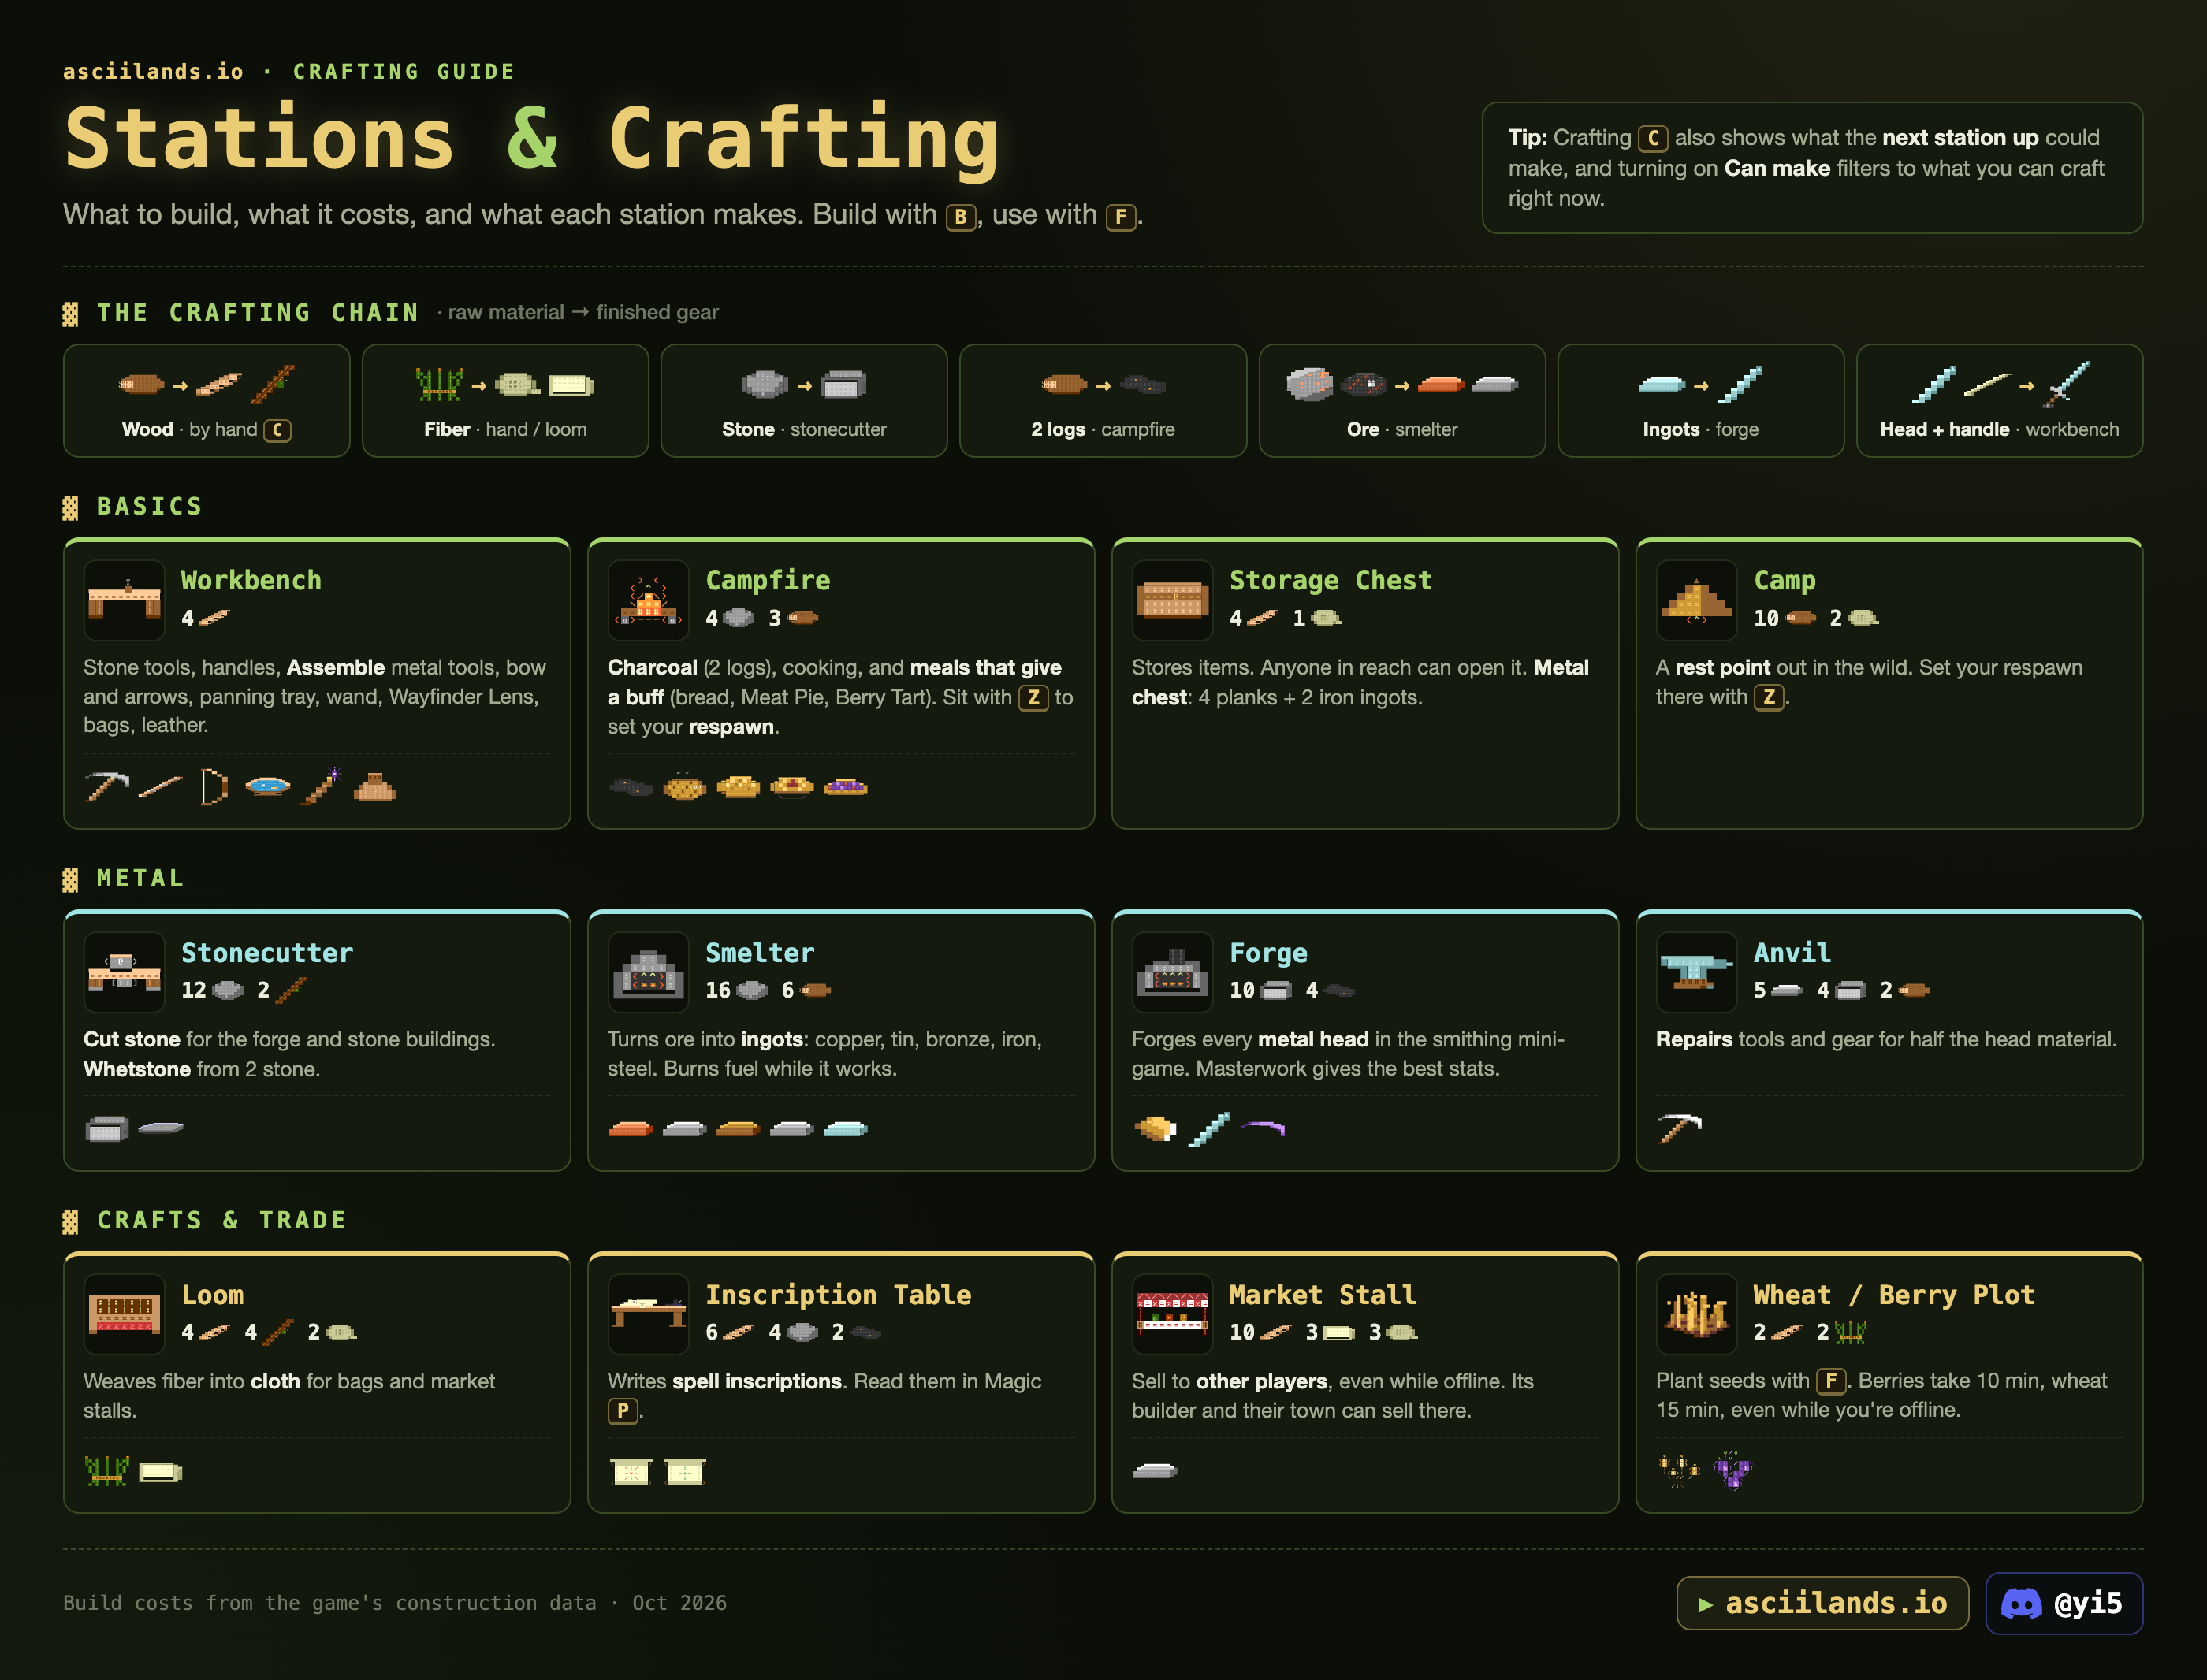
Build with B, use with F. Crafting C also shows what the next station up could make, and Can make filters to what you can craft right now. Stay near the station until your item is ready.
The crafting chain
Wood (by hand) → planks, sticks · Fiber (hand / loom) → rope, cloth · Stone (stonecutter) → cut stone · 2 logs (campfire) → charcoal · Ore (smelter) → ingots · Ingots (forge) → heads · Head + handle (workbench) → tool.
Stations
Campfire and smelter
Processing stations work in batches: load a batch with its fuel, it finishes over time, then take the output. Smelters burn 1 charcoal or 3 logs per batch. The input sits inside the station, and stations are open to anyone in reach, so use your own and stay close.
By hand C
Farming
- Craft seeds C, build a matching plot on open, dry ground, and press F to plant. Berries grow in 10 minutes, wheat in 15, even while you're offline.
- Equip a hoe and F on a growing crop to tend it for 50% more produce. Or fertilize with compost for double produce, ready sooner. A hoe also adds produce at harvest; better metal and finer forging add more.
- Press F when ripe to collect produce and replacement seeds. Ready crops wait until you have room for the whole harvest.
- Town members with building permission can work your plots. Removing a plot destroys its crop.
Chests and storage
- Anyone close enough can take what's in a storage chest or station. Keep supplies behind walls and a closed door, and watch out for open windows. A metal chest opens only for its owner.
- Stacks go up to 999. A chest with goods in it can't be removed; empty it first.
- In chests and stations: Left click picks up or puts down a stack, Right click picks up half or puts down one, Shift+Left click moves a whole stack.
- Craft weight counts the whole output: it must fit in your free carry capacity before the inputs are used up. tested
Show the original infographic
Tools
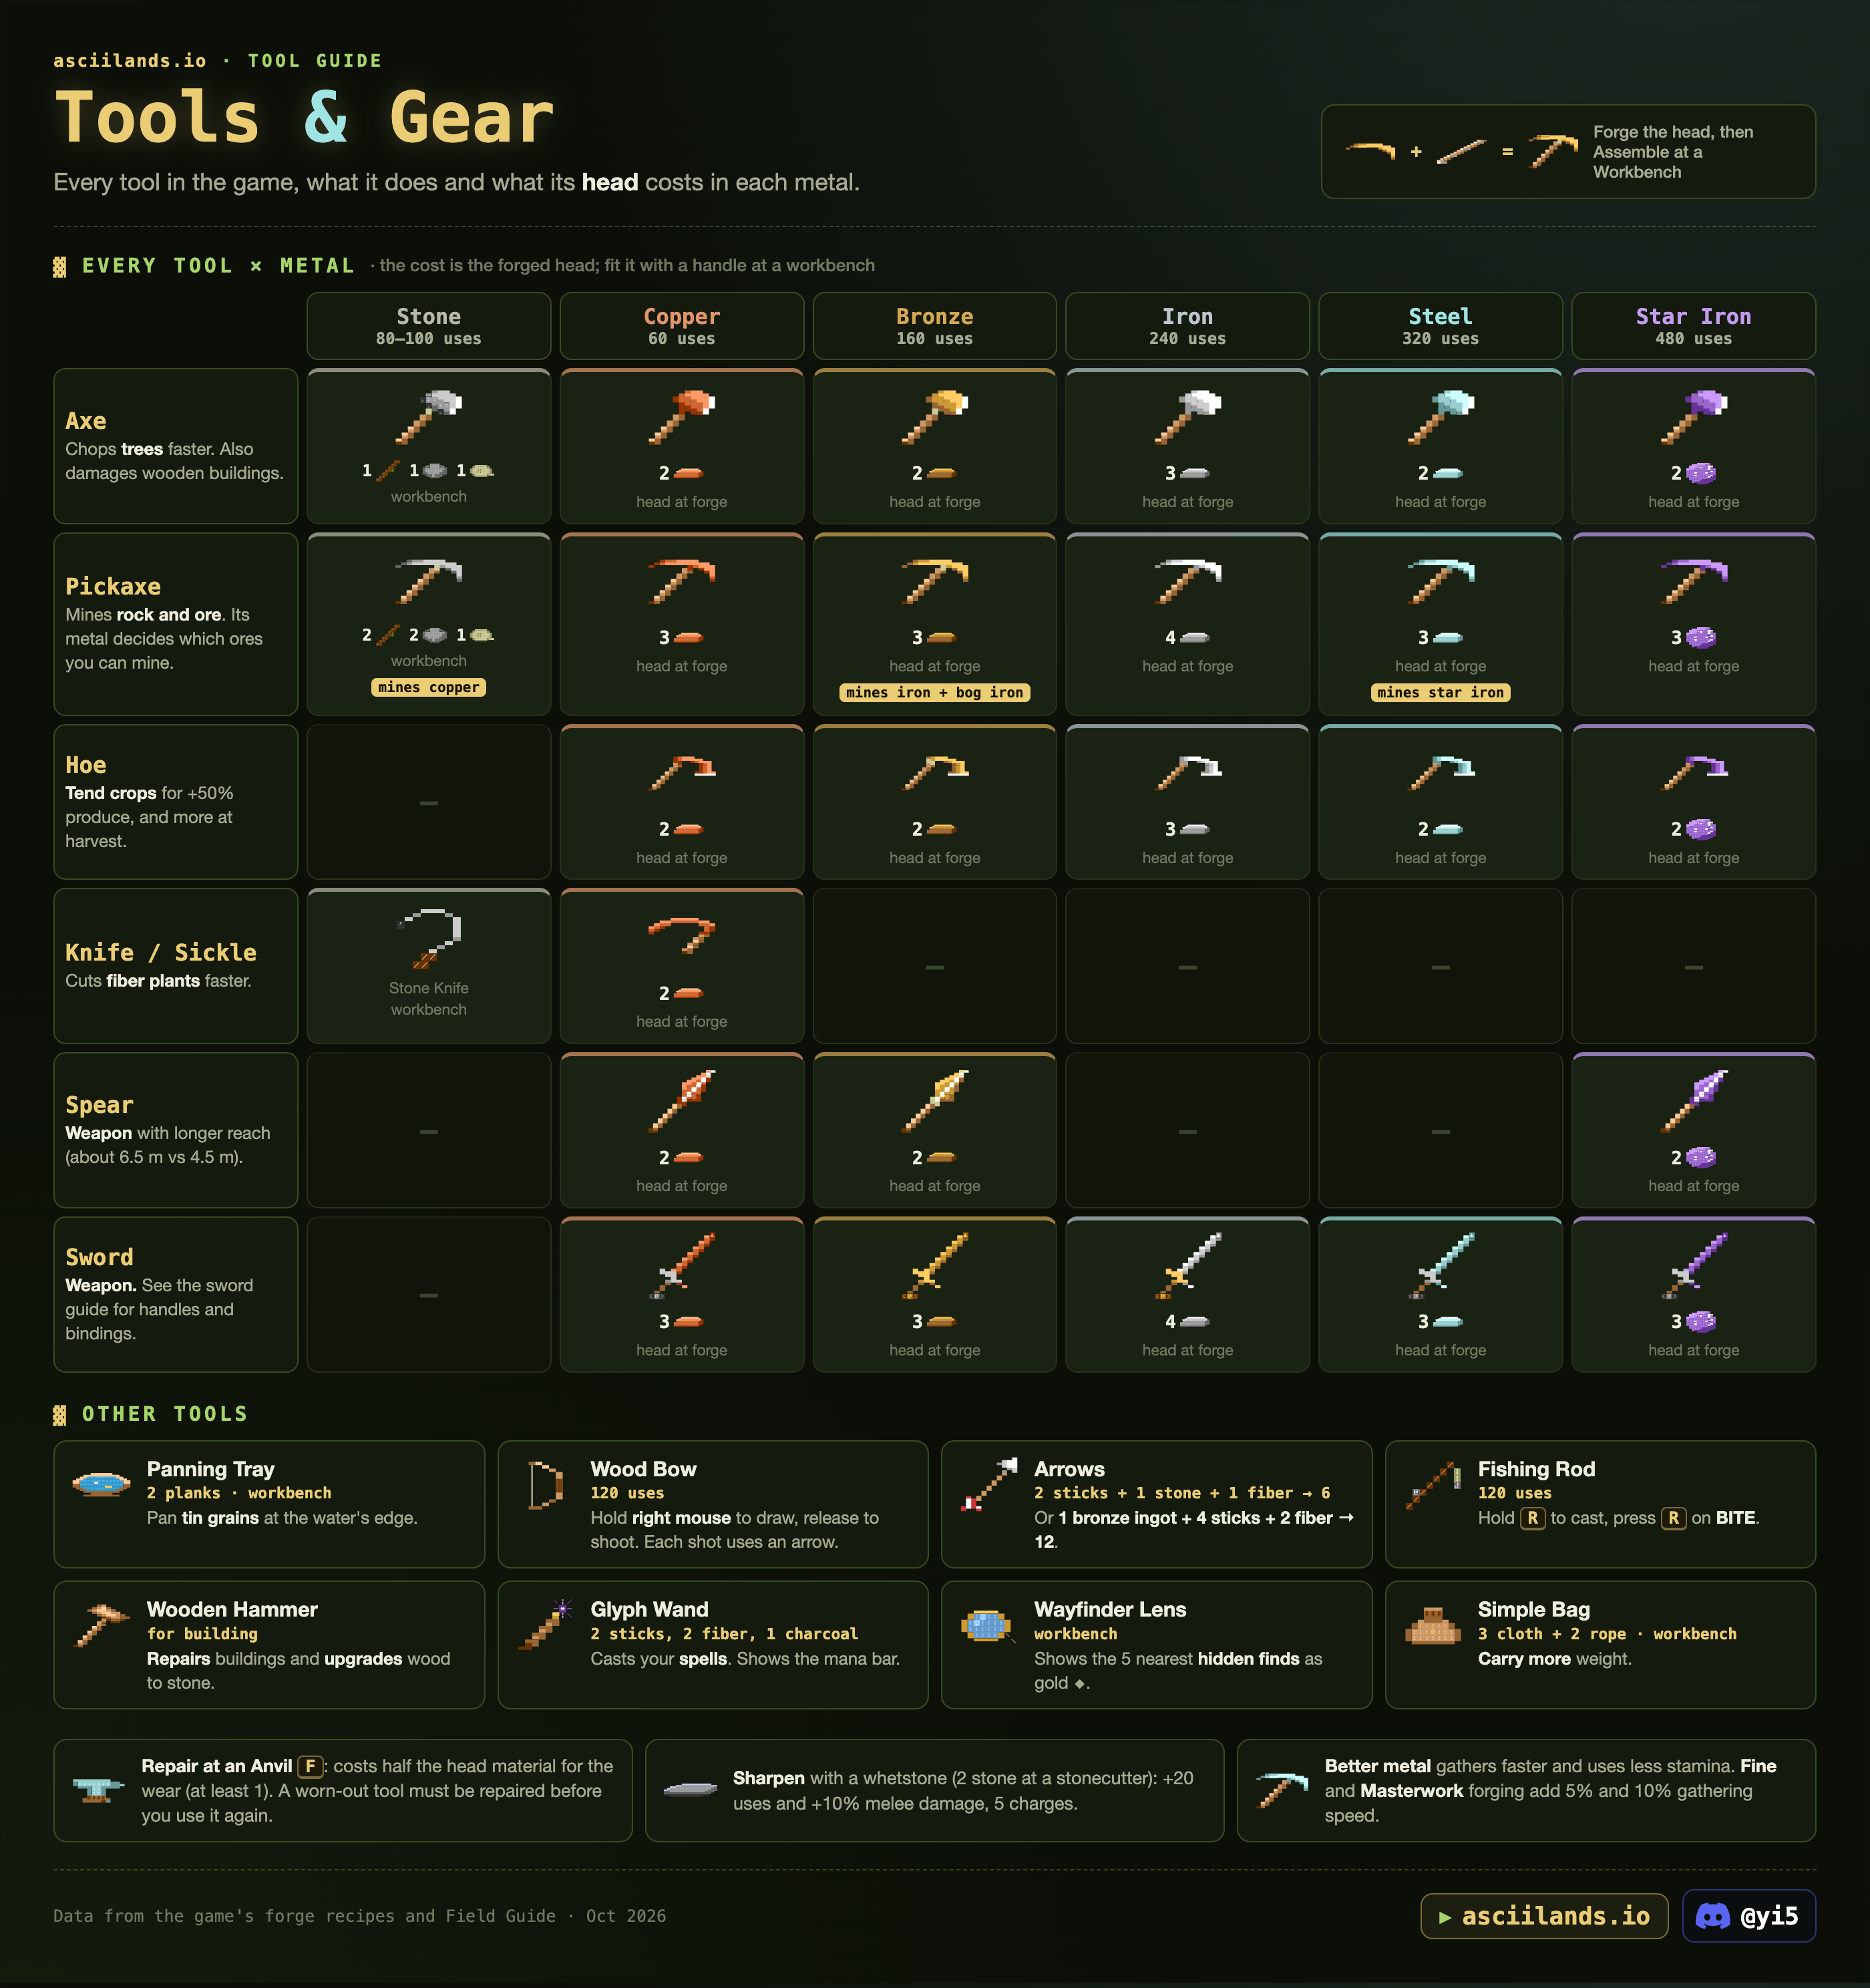
Forge the metal head at a Forge, then Assemble it with a handle at a Workbench. Better metal gathers faster, uses less stamina and lasts longer. Tools wear out; repair one before you use it again.
Every tool × metal
Speed and stamina
From the game's tool data. Pickaxes cost more stamina and swing slower on ore, shown after the slash.
Pickaxe ladder
Path to good gear: stone pickaxe → copper + panned tin → bronze pickaxe → iron → steel → Star Iron.
Other tools
| Tool | Recipe | Use |
|---|---|---|
| Panning Tray | 2 planks · workbench | Pan tin grains at the water's edge. |
| Wood Bow | Workbench · 120 uses | Hold right mouse to draw, release to shoot. Each shot uses an arrow. |
| Arrows | 2 sticks + 1 stone + 1 fiber → 6, or 1 bronze ingot + 4 sticks + 2 fiber → 12 | Ammunition. |
| Fishing Rod | 120 uses | Hold R to cast, press R on BITE. |
| Wooden Hammer | For building | Repairs buildings (Maintain) and upgrades wood to stone. |
| Glyph Wand | 2 sticks, 2 fiber, 1 charcoal · workbench | Casts your spells. Carrying it shows the mana bar. |
| Wayfinder Lens | Workbench | Shows the 5 nearest hidden finds as gold ◆. |
| Simple Bag | 3 cloth + 2 rope · workbench | Carry more weight. |
Repairs and sharpening
- Repair at an Anvil F: costs half the head material for the wear (at least 1). Anyone's anvil works. tested
- Sharpen with a whetstone (2 stone at a stonecutter): select a tool in your Pack and choose Sharpen. Each sharpening adds 20 uses with 10% more melee damage and less stamina. A whetstone lasts 5 sharpenings.
- Fine and Masterwork forging add 5% and 10% gathering speed. See Smithing.
Show the original infographic
Smithing & swords
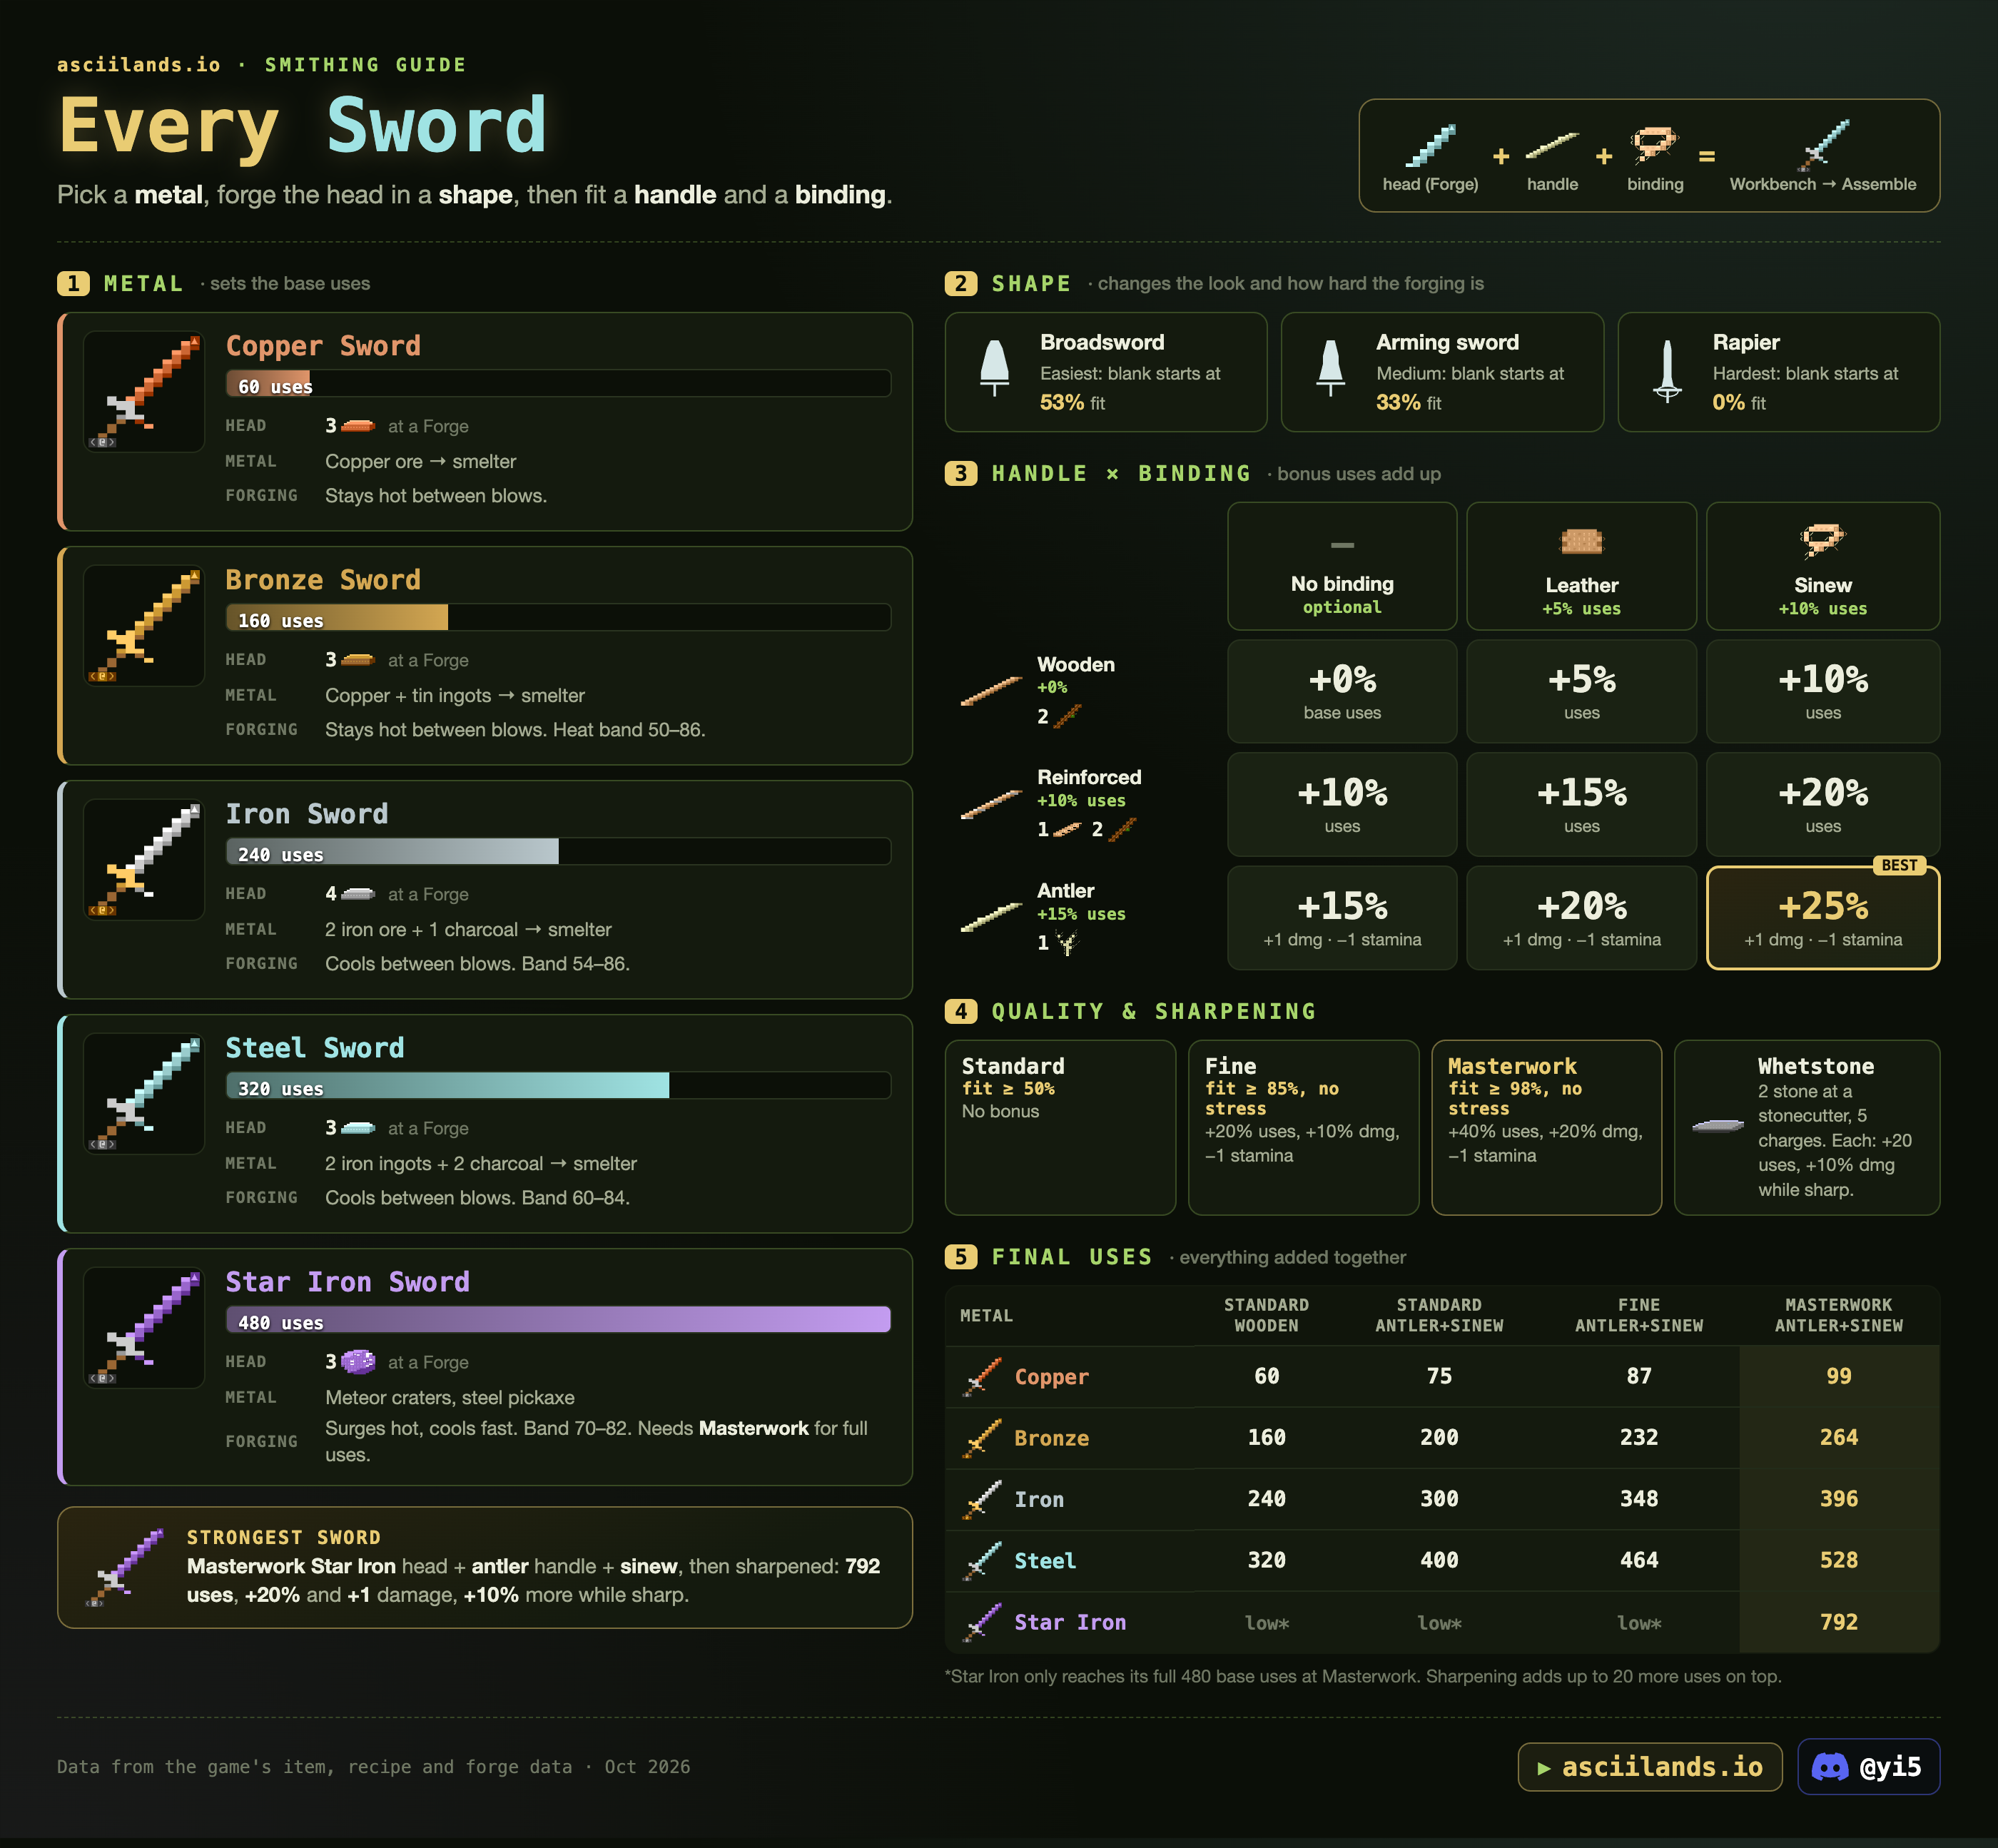
Pick a metal, forge the head in a shape, then fit a handle and a binding at a Workbench (Assemble tool). Your name is stamped on every head you forge.
Forging
- Heat until the marker reaches the gold band.
- Strike with light or heavy blows; Draw to narrow and Widen to spread, to match the dashed outline.
- Overworked metal shows stress. At gold heat, a light blow removes one stress mark. Cool lowers the heat.
The Field Guide has a free smithing practice mode: use it before spending ingots.
| Quality | Needs | Bonus |
|---|---|---|
| Standard | ≥ 50% fit | None |
| Fine | ≥ 85% fit, no stress | +20% durability, +10% melee damage, +5% gathering speed, 1 stamina less per swing |
| Masterwork | ≥ 98% fit, no stress | +40% durability, +20% melee damage, +10% gathering speed, 1 stamina less per swing |
The finish (Hammered, Polished, Etched) only changes the look. There's no enchanting or rarity.
Sword metals
Shape
Changes the look and how hard the forging is: Broadsword (easiest, blank starts at 53% fit), Arming sword (medium, 33%), Rapier (hardest, 0%).
Handle × binding
Bonus uses add up. A Wooden Handle is made and fitted from 2 sticks in one step; craft Reinforced or Antler handles at the Workbench first. Sinew has no recipe: deer drop it.
| Handle | No binding | Leather (+5%) | Sinew (+10%) |
|---|---|---|---|
| Wooden (2 sticks) | +0% | +5% | +10% |
| Reinforced (+10%) | +10% | +15% | +20% |
| Antler (+15%, +1 dmg, −1 stamina) | +15% | +20% | +25% best |
Durability calculator
Works for every tool: handles, bindings and forging quality add up.
Final uses
| Metal | Standard, wooden | Standard, antler + sinew | Fine, antler + sinew | Masterwork, antler + sinew |
|---|---|---|---|---|
| Copper | 60 | 75 | 87 | 99 |
| Bronze | 160 | 200 | 232 | 264 |
| Iron | 240 | 300 | 348 | 396 |
| Steel | 320 | 400 | 464 | 528 |
| Star Iron | low* | low* | low* | 792 |
*Star Iron only reaches its full 480 base uses at Masterwork. Sharpening adds 20 uses on top. Example: a Masterwork steel sword with reinforced handle + leather has 496 uses.
Show the original infographic
Magic
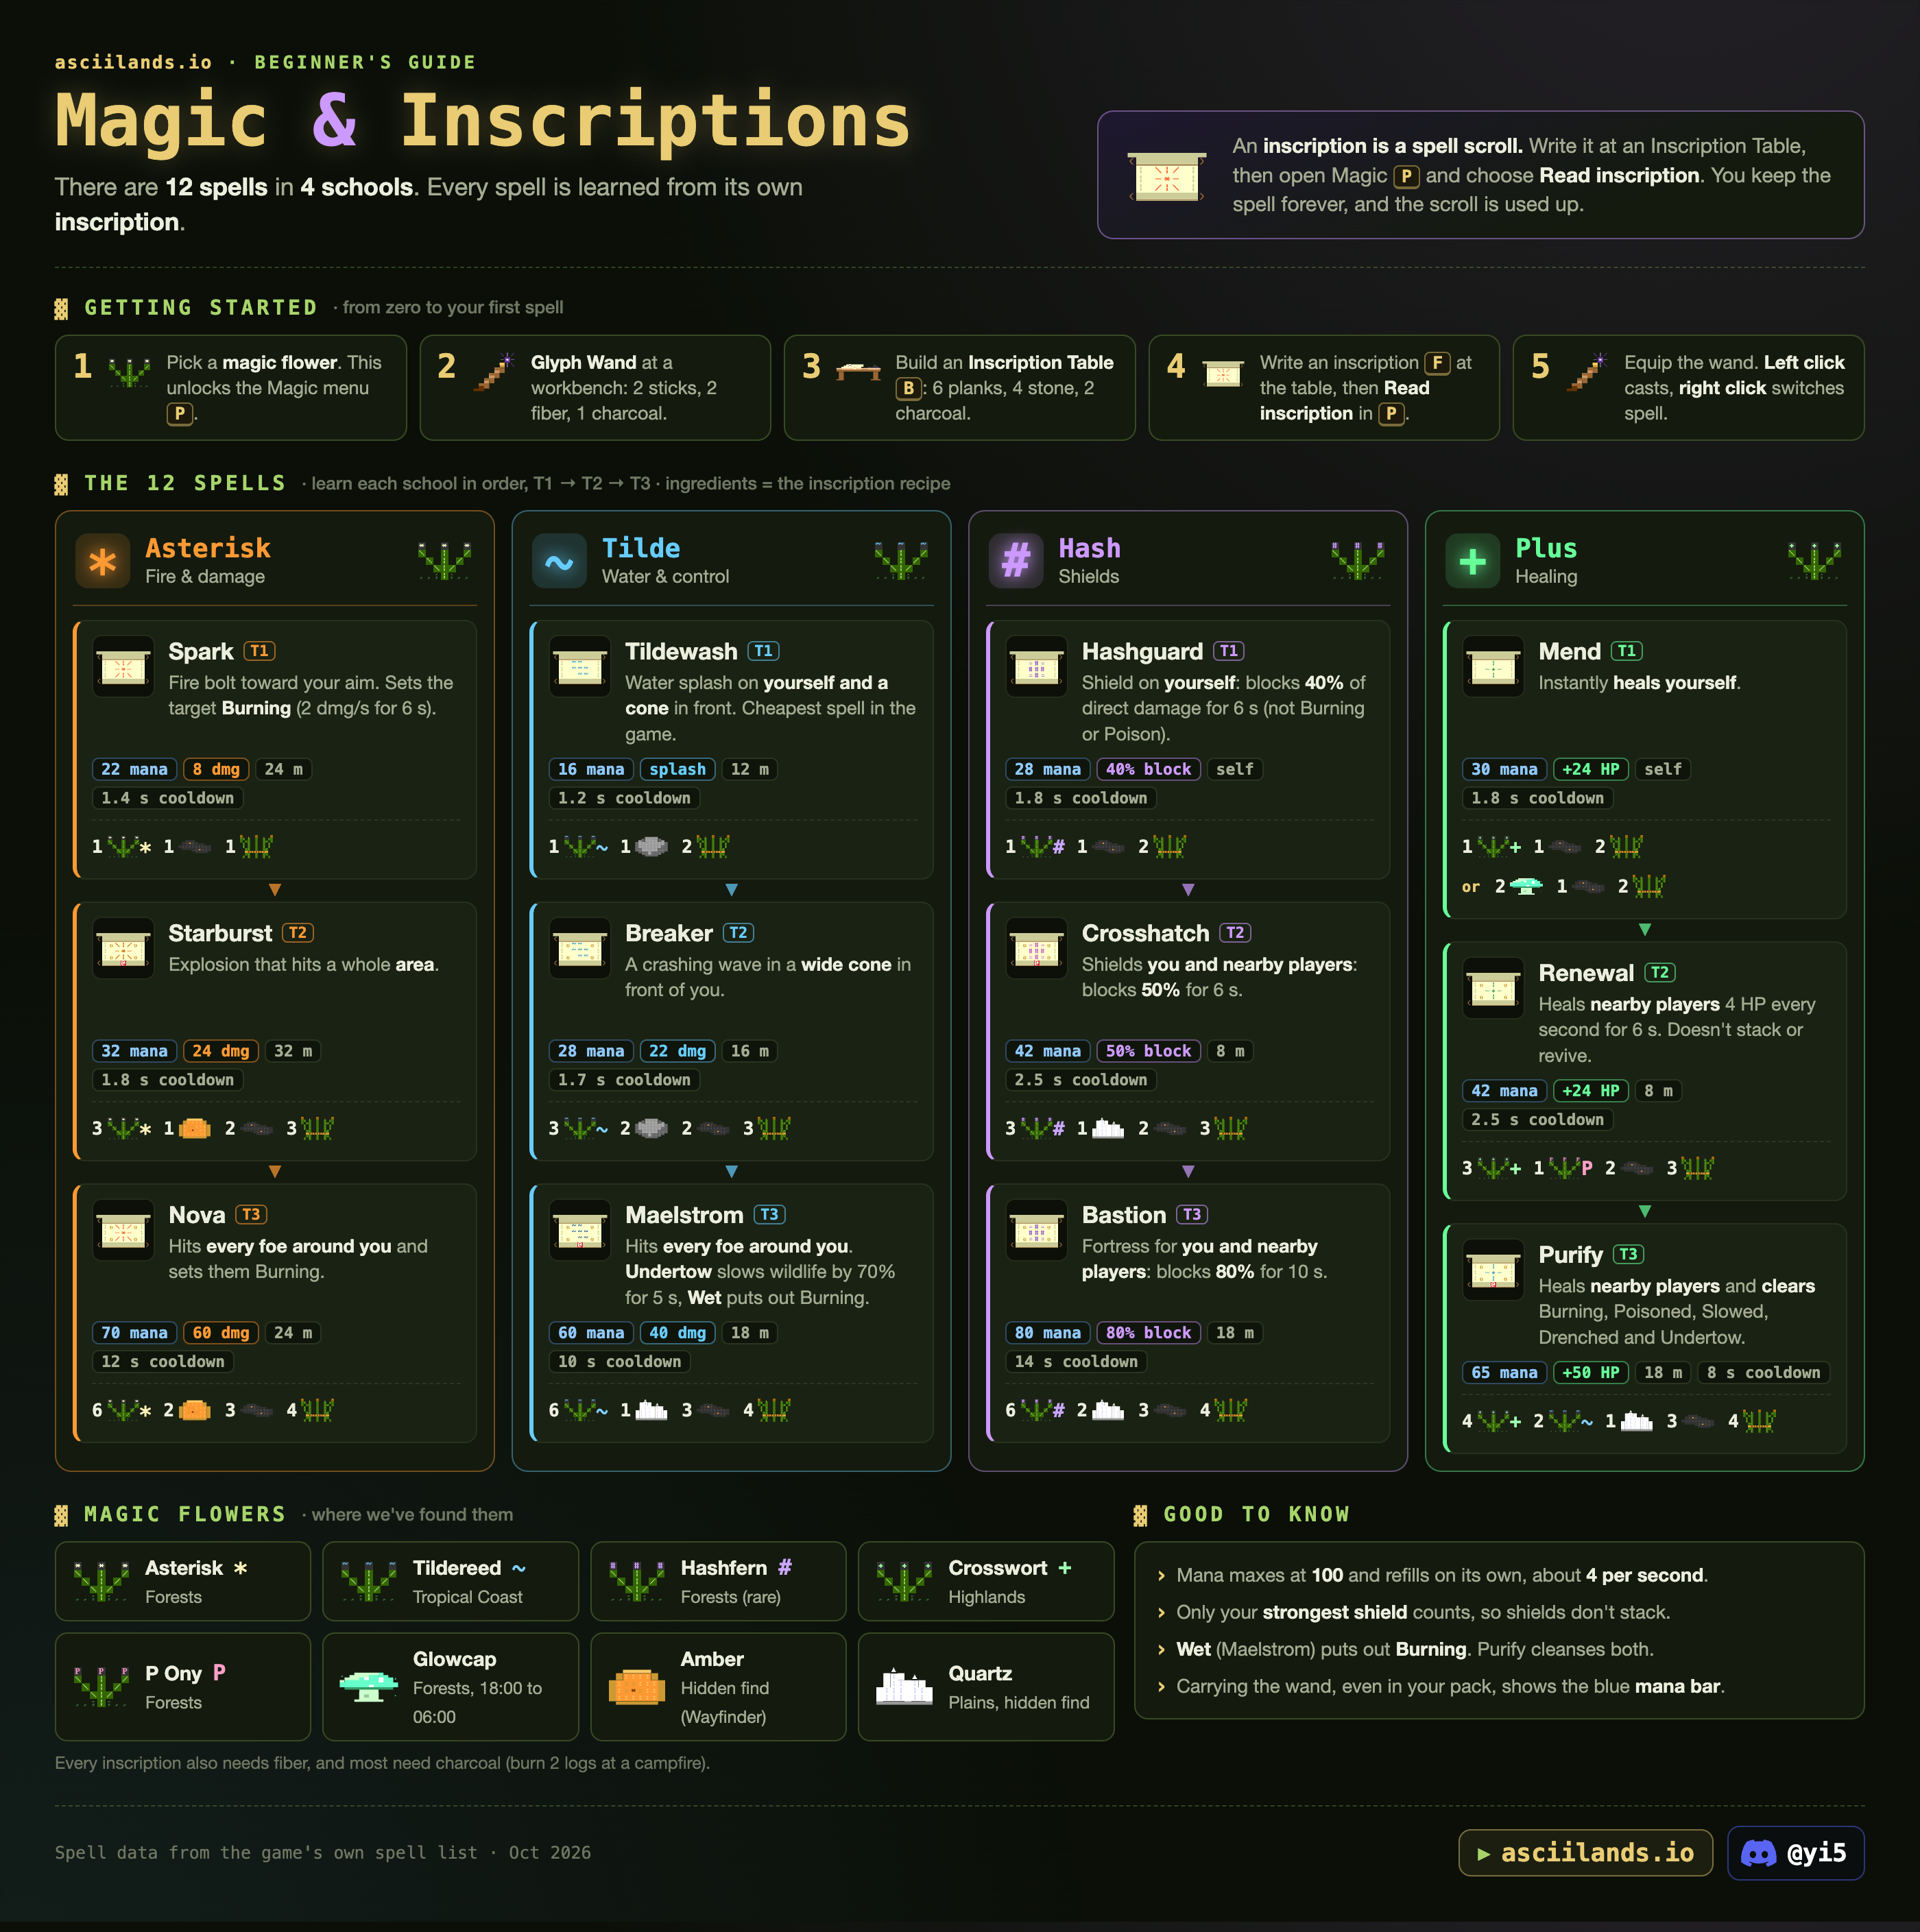
There are 12 spells in 4 schools. Every spell is learned from its own inscription: a spell scroll you write at an Inscription Table, then read in Magic P. You keep the spell forever and the scroll is used up.
Your first spell
- Pick a magic flower. This unlocks the Magic menu P.
- Make a Glyph Wand at a workbench: 2 sticks, 2 fiber, 1 charcoal.
- Build an Inscription Table B: 6 planks, 4 stone, 2 charcoal.
- Write an inscription F at the table, then choose Read inscription in P.
- Equip the wand. Left click casts toward your aim, Right click switches to the next learned spell.
Learn each school in order: T1 → T2 → T3. Ingredients below are the inscription recipe.
The 12 spells
Good to know
- Mana maxes at 100 and refills on its own, about 4 per second.
- Only your strongest shield counts, so shields don't stack. Every ward also covers the caster.
- Wet (Maelstrom) puts out Burning. Purify cleanses both.
- Carrying the wand, even in your pack, shows the blue mana bar.
- Every inscription needs fiber, and most need charcoal (burn 2 logs at a campfire). Where the flowers grow: Materials.
Show the original infographic
Building
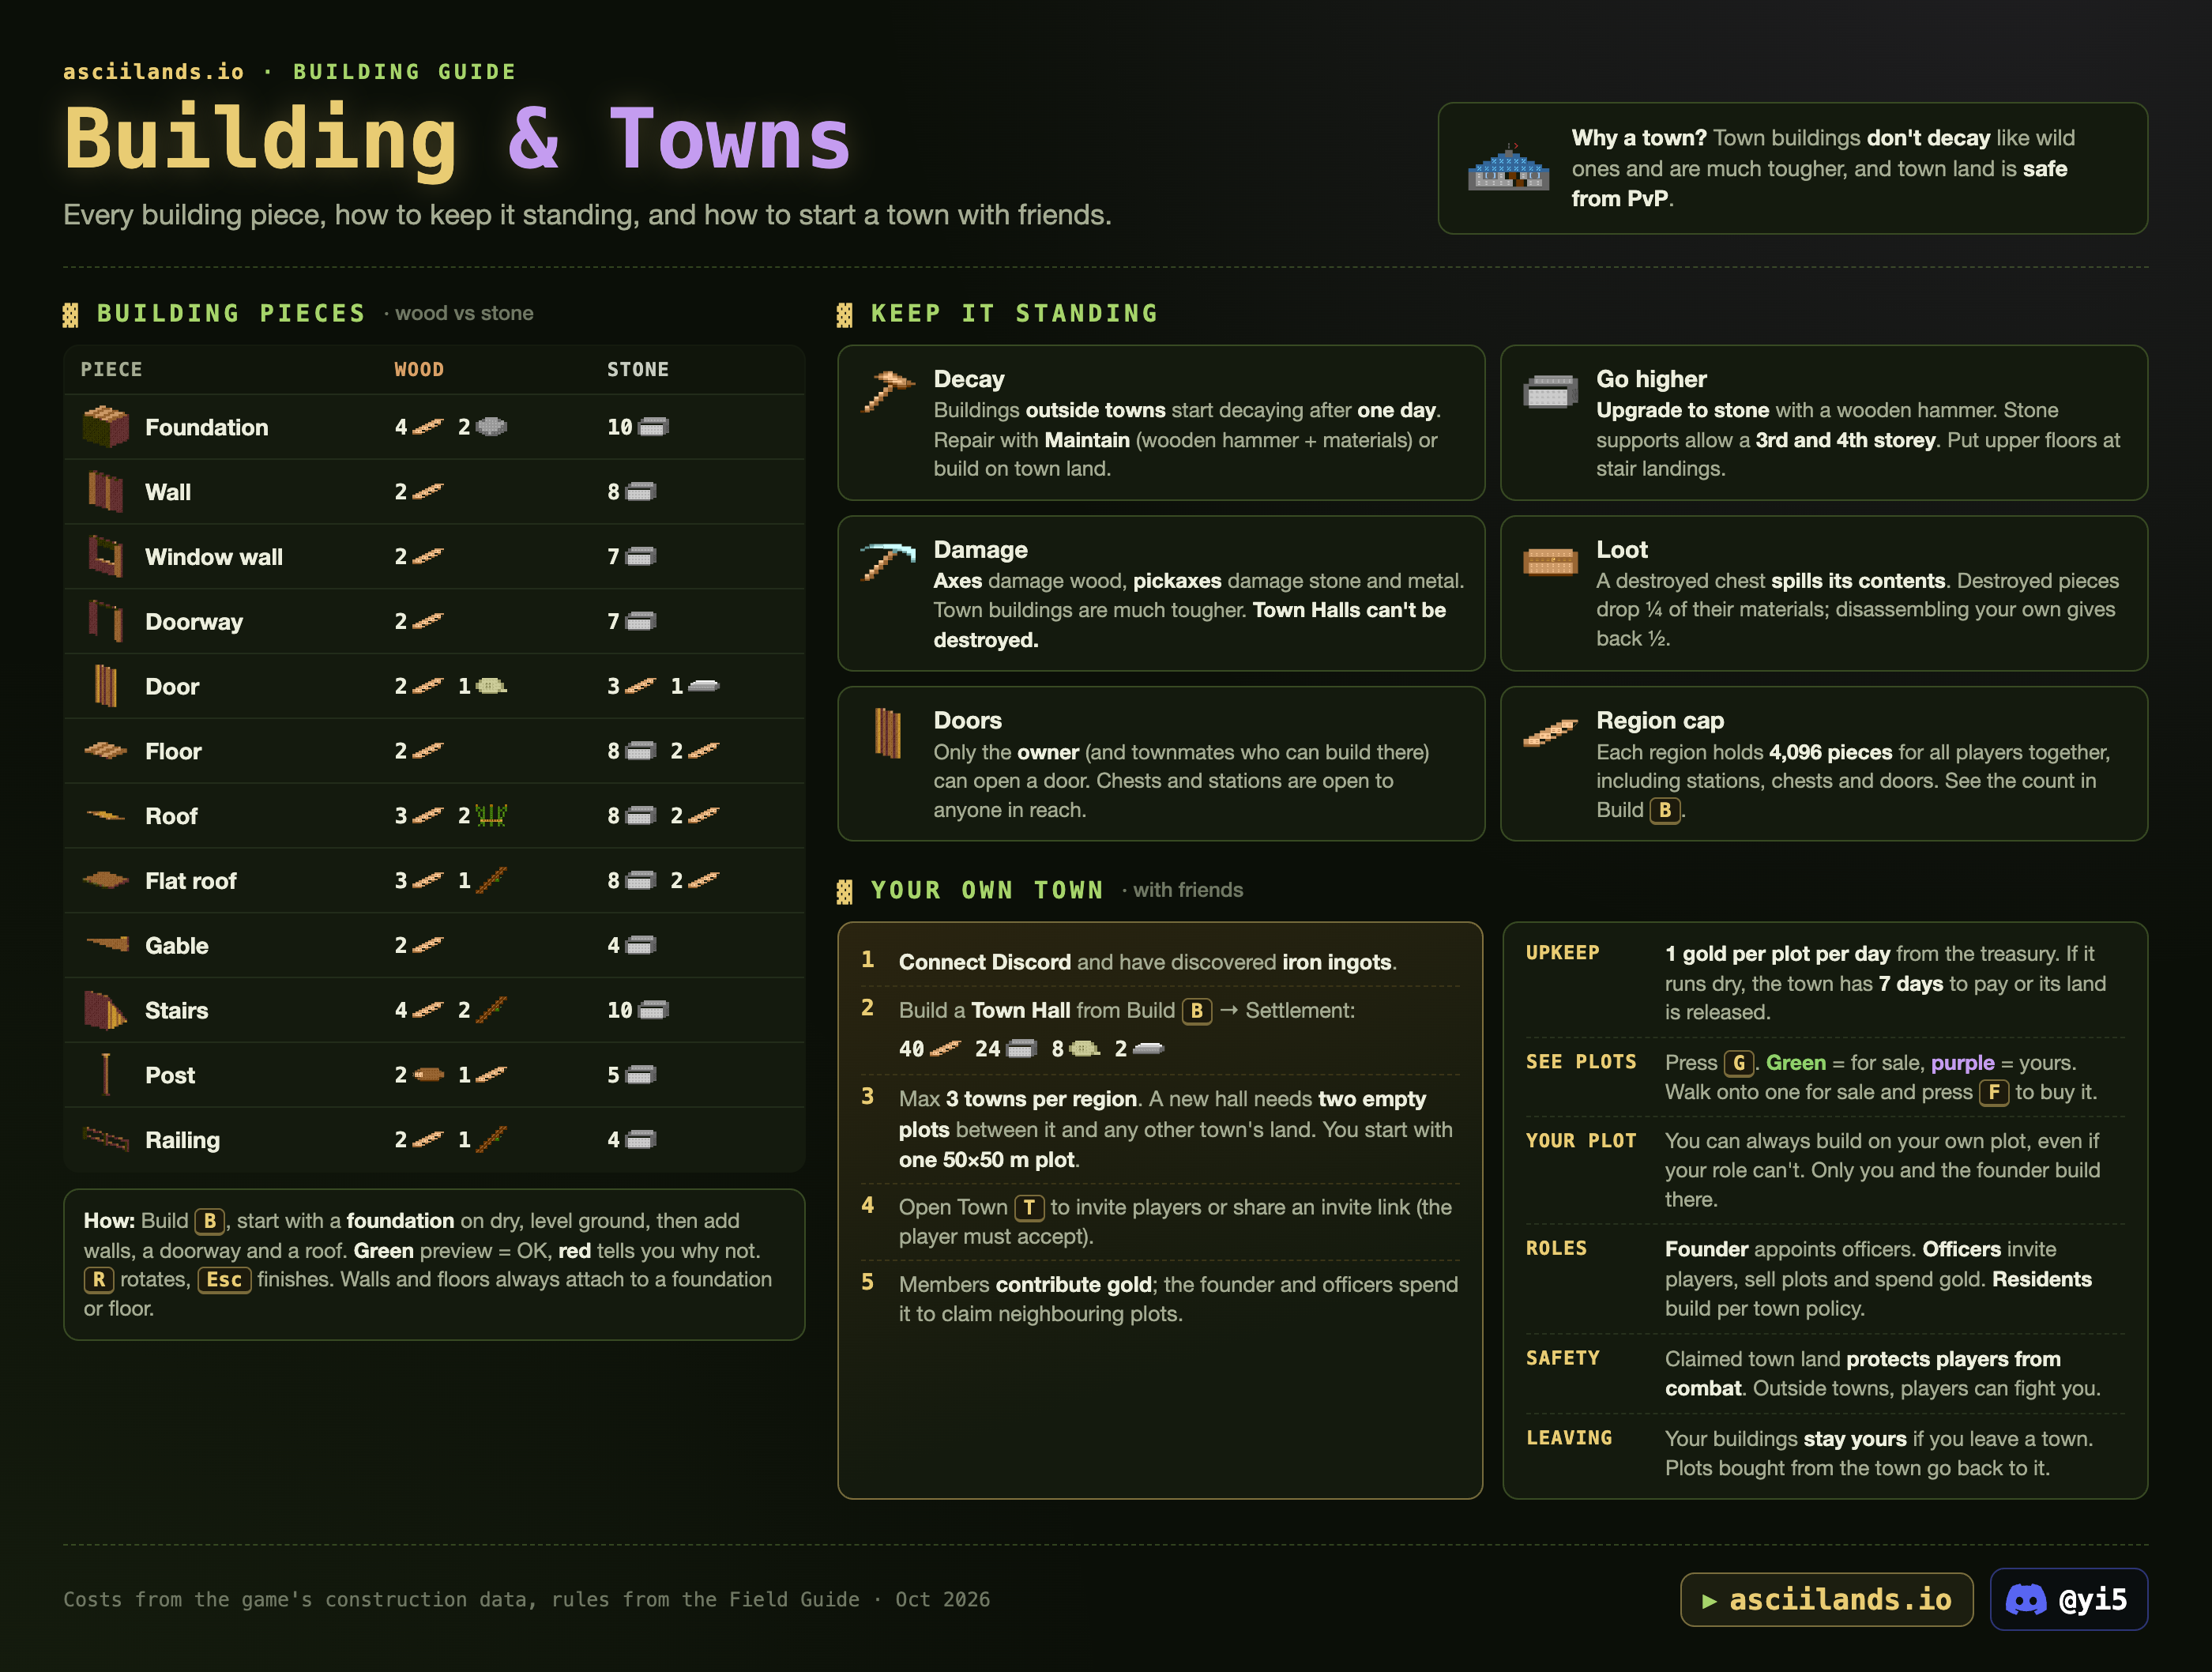
Build B: start with a foundation on dry, level ground, then add walls, a doorway and a roof. A green preview means OK; red tells you why not. R rotates floors, roofs and stairs, walls turn to fit their edge, Esc finishes. Walls and floors always attach to a foundation or floor.
Building pieces
Keep it standing
| Decay | Buildings outside towns start decaying after one day. Repair with Maintain (wooden hammer + the materials shown) or build on town land. |
| Go higher | Upgrade to stone with a wooden hammer. Stone supports allow a 3rd and 4th storey. Put upper floors at stair landings. |
| Damage | Axes damage wood, pickaxes damage stone and metal. Town buildings are much tougher. Town Halls can't be destroyed. Breaking a support can bring down the pieces above it. |
| Loot | A destroyed chest spills its contents. Destroyed pieces drop ¼ of their materials; disassembling your own gives back ½ (rounded down). Remove chests and furnishings from a support first, and start at the top. |
| Doors | Only the owner (and townmates who can build there) can open a door. Chests and stations are open to anyone in reach. |
| Region cap | Each region holds 4,096 pieces for all players together, including stations, chests and doors. Build B shows the count. At the limit new pieces are refused and cost nothing. |
Tips from building
- A foundation sits at the highest ground under it. On a slope its downhill edge can float metres up (3.8 m measured), and a doorway there can't be reached. Put doorways where the floor is within about 1 m of the ground. tested
- You need to stand close to remove a piece (it worked within 6 m, failed at 11 m). Remove a doorway's door first. tested
- Standing on a raised slab can put a station below you "out of reach". Step off. tested
- Chests and stations can go indoors on a foundation; two chests fit on one 6 m tile. tested
- Sign posts hold 3 lines of up to 24 characters, readable within 8 m.
Show the original infographic
Towns & friends
Why a town? Town buildings don't decay like wild ones and are much tougher, and town land is safe from PvP.
Founding a town
- Connect Discord and discover iron ingots.
- Build a Town Hall from Build B → Settlement: 40 planks, 24 cut stone, 8 rope, 2 iron ingots.
- A region holds at most 3 towns. Halls stand at least 200 m apart, with two empty plots between a new hall and another town's land. You start with one 50 × 50 m plot.
- Open Town T to invite players nearby or share an invite link (they must accept).
- Members contribute gold; the founder and officers spend it to claim neighbouring plots. Each new plot costs more: 30 + 12 × plots already owned.
Rules
| Upkeep | 1 gold per plot per day from the treasury. If it runs dry, the town has 7 days to pay or its land is released. |
| See plots | Press G. Green = for sale, purple = yours. Walk onto a plot for sale and press F to buy it; the gold goes to the treasury. |
| Your plot | You can always build on your own plot, even if your role can't. Only you and the founder build there. Buyers who aren't members stay visitors (no door access). The hall plot can't be sold. |
| Selling plots | Founders and officers sell plots in Town → Plots: pick a plot, choose who can buy (anyone or residents) and set a price. The founder can take any plot back for free. No refunds. |
| Roles | The founder appoints officers. Officers invite players, sell plots and spend gold. Residents build per town policy. New members joining by link start as residents. The founder can hand leadership to a resident or officer. |
| Safety | Claimed town land protects players from combat. Outside towns, players can fight you. |
| Leaving | Your buildings stay yours if you leave. Plots bought from the town go back to it. |
Friends and parties
- Open Social N. Connect Discord to add friends, form parties and join towns. Copy your friend code or enter theirs.
- A party holds up to eight players. Invitation links last 24 hours; accept them in Social once you're in the world.
- Blocking someone stops their invitations and hides their party chat and presence, but keeps you both in any shared party or town.
- Your party stays together through reconnects. Party chat clears when you close the browser.
Companions
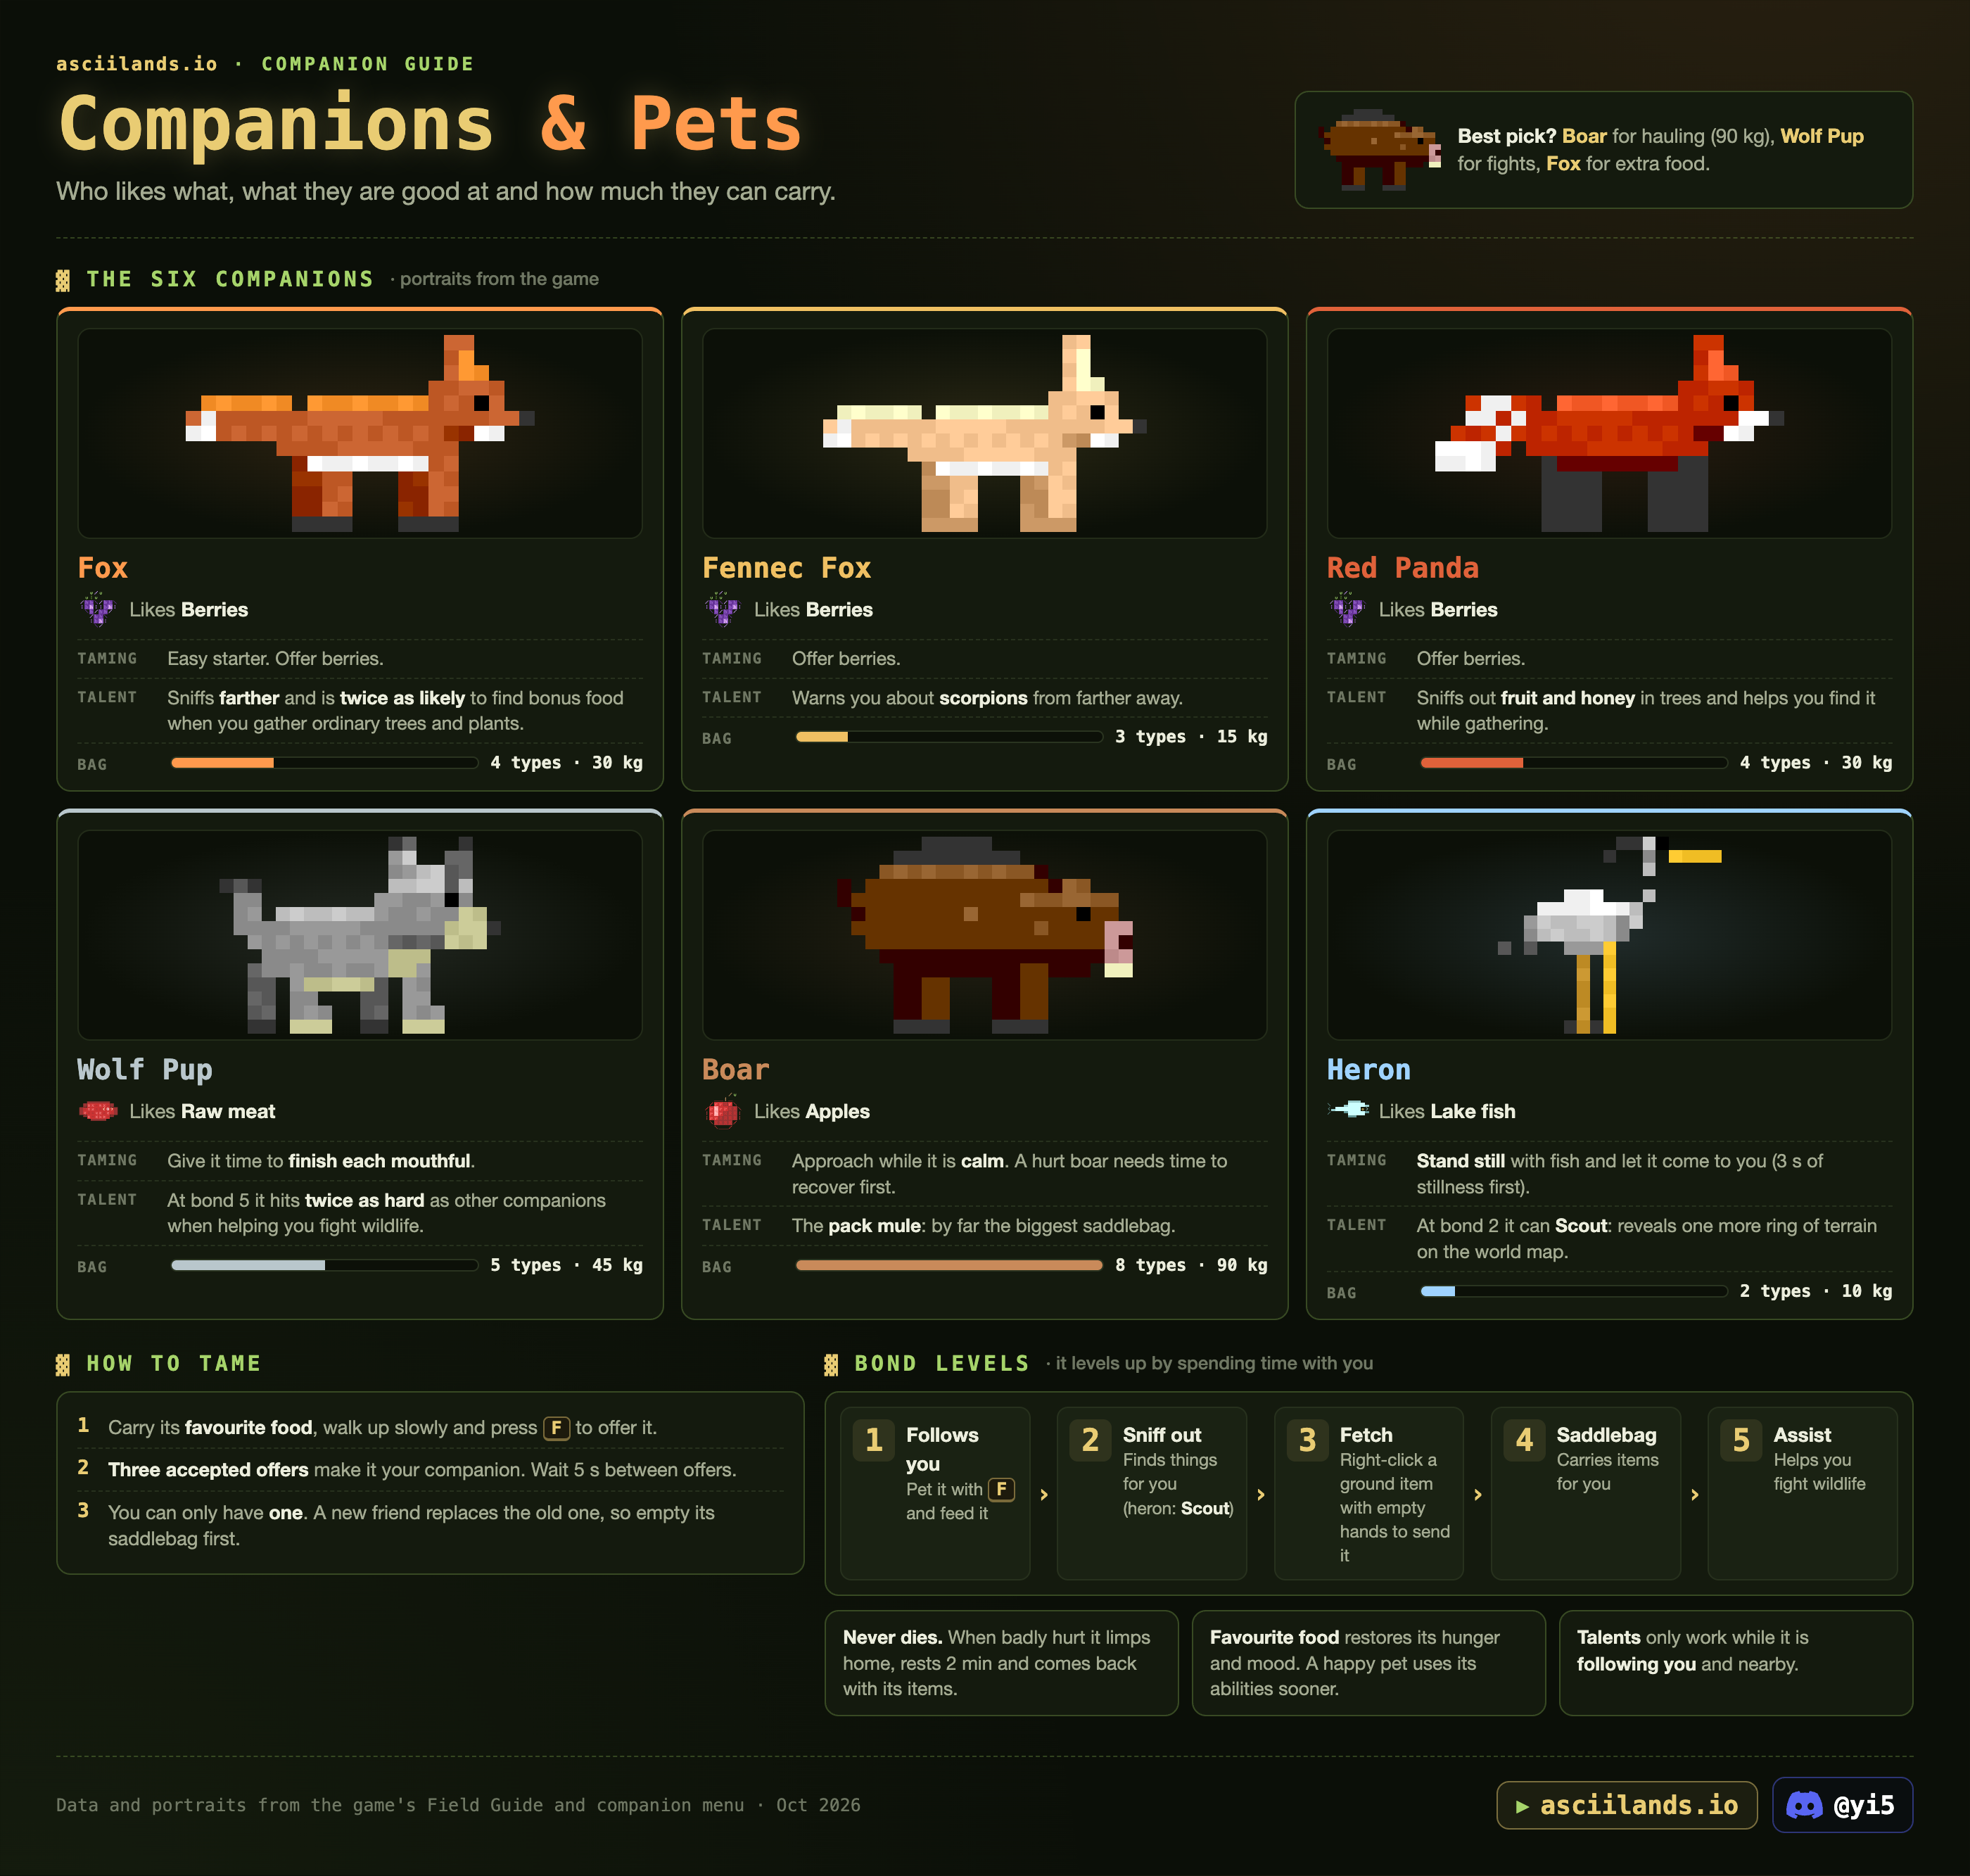
One animal friend at a time. Best picks: Boar for hauling (90 kg), Wolf Pup for fights, Fox for extra food.
| Companion | Likes | Taming | Talent | Saddlebag |
|---|---|---|---|---|
| Fox | Berries | Easy starter. | Sniffs farther and is twice as likely to find bonus food when you gather ordinary trees and plants. | 4 types · 30 kg |
| Fennec Fox | Berries | Offer berries. | Warns you about scorpions from farther away. | 3 types · 15 kg |
| Red Panda | Berries | Offer berries. | Sniffs out fruit and honey in trees and helps you find it while gathering. | 4 types · 30 kg |
| Wolf Pup | Raw meat | Give it time to finish each mouthful. | At bond 5 it hits twice as hard as other companions when helping you fight wildlife. | 5 types · 45 kg |
| Boar | Apples | Approach while it's calm. A hurt boar needs time to recover first. | The pack mule: by far the biggest saddlebag. | 8 types · 90 kg |
| Heron | Lake fish | Stand still with fish and let it come to you (3 s of stillness first; moving makes it cautious again). | At bond 2 it can Scout: reveals one more ring of terrain on the world map. | 2 types · 10 kg |
How to tame
- Carry its favourite food, walk up slowly and press F to offer it (from within about 7 m).
- Three accepted offers make it your companion. Wait 5 s between offers.
- You can only have one. A new friend replaces the old one, so empty its saddlebag and finish any Fetch trip first.
Bond levels
It levels up by spending time with you.
- Follows you. Pet it with F (lifts its mood once a minute) and feed it.
- Sniff out. Finds things for you (heron: Scout).
- Fetch. Right-click a ground item with empty hands to send it.
- Saddlebag. Carries items for you. Items already in the bag stay even over the limit.
- Assist. Helps you fight wildlife.
- Never dies. When badly hurt it limps home, rests 2 minutes and comes back with its items. Companions never starve.
- Favourite food restores its hunger and mood. A happy pet uses its abilities sooner.
- Talents only work while it's following you and nearby.
Show the original infographic
Market & prices
Live player prices from every region's market stalls.
How trading works
- Merchant: walk to any market stall and press F, or open Trade K. Under Supplies you buy from or sell to the merchant. It only trades the 8 basics below.
- Player offers: each stall has its own offers. Its builder and their town can sell there; anyone can buy. Choose Sell, pick an item, set quantity and gold per item, and List. You get the gold when it sells, even offline. Buyers can take part of a stack. Withdraw unsold items under My offers.
- Buy orders: players also post "wanted" orders: what they'll pay for an item. They show as Best buy order below.
- Stalls behind your town walls are only reachable by townmates (doors stay shut for others). Put a stall outside if you want customers. A sign post nearby helps.
The merchant
| Item | Merchant pays you | Merchant charges |
|---|---|---|
| Loading… | ||
The merchant takes up to 999 of each item from you, ever: its stock is per character and doesn't drain. So merchant gold has a cap per character. tested
Live prices
Green = the cheapest a player is selling it for right now, and where. Blue = the best open buy order. Exchange = what the server exchange pays, for items it holds in stock. Click a column to sort; click a region to see it on the map.
| Item | Cheapest | Qty | # listings | Where to buy | Best buy order | Exchange |
|---|
Craft or buy?
Every craftable item on sale, compared with buying its raw materials at today's cheapest offers (or from the merchant). Doesn't count your time.
Loading...